js基础知识系列(六)

面向对象的程序设计

对象定义

无序属性的集合,其属性可以包含基本值、对象或函数

属性类型

数据属性

  • [[configurable]]: 表示能否通过 delete 删除属性从而重新定义属性,能否修改属性特性,能否把属性修改为访问器属性
  • [[enumerable]]: 能否通过 for-in 循环返回属性
  • [[writable]]: 能否修改属性值
  • [[value]]: 属性值,默认 undefined
1
2
3
4
5
6
7
8
9
10
11
12
13
14
15
16
17
18
19
20
21
22
23
24
25
let person = {};
Object.defineProperty(person, "test", {
configurable: false,
enumerable: false,
writable: false,
value: "hello world",
});

person.test = "test"; // 修改值

// 无法修改值
console.log(person.test); // "hello world"

// 无法修改属性特性
Object.defineProperty(person, "test", {
configurable: false,
enumerable: false,
writable: false,
value: "hello world 1",
}); // TypeError: Cannot redefine property: test

// 不能通过 for-in 循环返回属性
for (prop in person) {
console.log(prop); // 无输出
}

访问器属性

  • [[configurable]]: 表示能否通过 delete 删除属性从而重新定义属性,能否修改属性特性,能否把属性修改为访问器属性
  • [[enumerable]]: 能否通过 for-in 循环返回属性
  • [[get]]: 读取属性时调用
  • [[set]]: 写入属性时调用
1
2
3
4
5
6
7
8
9
10
11
12
13
14
15
16
17
18
19
20
21
22
let person = {
_test: "hello world",
};
Object.defineProperty(person, "test", {
configurable: true,
enumerable: true,
get: function () {
return this._test + " get";
},
set: function (value) {
this._test = value + "set";
},
});

// 通过 for-in 循环返回属性
for (prop in person) {
console.log(prop); // test
}

person.test = "hello "; // 写入时调用 set
// 读取时调用 get
console.log(person.test); // hello set get

tips: 定义多个属性使用 Object.defineProperties, 示例如下

1
2
3
4
5
Object.defineProperties(person, {
test: {
value: "hello world"
}
})

读取属性特性

Object.getOwnPropertyDescriptor 返回属性特性

1
2
3
4
5
6
7
8
9
10
11
12
13
14
15
16
17
18
19
20
21
22
23
24
let person = {
_test: "hello world",
};
Object.defineProperties(person, {
test: {
configurable: true,
enumerable: true,
get: function () {
return this._test + " get";
},
set: function (value) {
this._test = value + "set";
},
},
test1: {
configurable: false,
enumerable: false,
writable: false,
value: "hello world 1",
},
});

Object.getOwnPropertyDescriptor(person, "test"); // {enumerable: true, configurable: true, get: ƒ, set: ƒ}
Object.getOwnPropertyDescriptor(person, "test1"); // {value: "hello world 1", writable: false, enumerable: false, configurable: false}

创建对象

工厂模式

1
2
3
4
5
6
function createObj(name) {
const obj = new Object();
obj.name = name;
return obj;
}
const t = createObj("test"); // {name: "test"}
  • 优点:创建多个相似对象问题
  • 缺点:无法识别对象

构造函数

1
2
3
4
5
6
7
8
9
10
function Obj(name) {
this.name = name;
this.sayName = function () {
console.log(this.name);
};
}
const obj1 = new Obj("test"); // {name: "test", sayName: ƒ}

// 识别对象
obj1 instanceof Obj; // true
  • 创建新对象
  • 新对象的作用域赋值给构造函数(this 指向了新对象)
  • 执行构造函数中的代码
  • 返回新对象
优点
  • 可以识别对象
缺点
  • 必须通过 new 操作符调用
  • 每个方法都需要在实例上再创建一遍

原型模式

每个函数都有一个 prototype (原型) 属性,这是一个指针,指向原型对象,这个对象包含这个类型的所有实例共享的属性和方法,prototype (原型) 属性默认包含一个 constructor 属性指向当前的构造函数。查找属性或者方法时优先从实例对象上查找,再从原型链上查找

  • in 能查找到原型链上的属性
  • prototype.isPrototypeOf 原型对象可以检测是否是对象的实例
  • hasOwnProperty 属性是否只存在与实例中
  • Object.getOwnPropertyNames 获取所有实例属性,无论是否可以枚举
  • Object.keys 获取所有可以枚举实例属性
1
2
3
4
5
6
7
8
9
10
11
12
13
14
15
16
17
18
19
20
21
22
23
24
25
26
27
28
29
30
31
function Test1() {
//
}

Test1.prototype.name = "hello world";
Test1.prototype.sayName = function () {
console.log(this.name);
};

const obj1 = new Test1();

obj1.name = "obj1";
// 当前实例属性
obj1.sayName(); // obj1

// 属性是否只存在与实例中
obj1.hasOwnProperty("name"); // true

delete obj1.name;
// 原型链上属性
obj1.sayName(); // hello world
// 属性是否只存在与实例中
obj1.hasOwnProperty("name"); // false

"sayName" in obj1; // true

// 检测是否是对象的实例
Test1.prototype.isPrototypeOf(obj1); // true

// 获取所有实例属性
Object.getOwnPropertyNames(Test1.prototype); // ["constructor", "name", "sayName"]
对象方法创建原型

通过字面量的方法创建原型对象时 constructor 被指向了字面量的 constructor 指向的对象,可通过在字面量中指定 constructor 属性的方法确定 constructor 的指向

1
2
3
4
5
6
7
8
9
10
11
12
function Test1() {
//
}

Test1.prototype = {
name: "hello world",
};

// constructor 被指向了 Object
const obj1 = new Test1();
console.log(obj1.constructor === Test1); // false
console.log(obj1.constructor === Object); // true
原型的动态性

实例指向最原始的原型,不是指向构造函数,重写整个原型后可能导致重写之前调用的重写之后的属性无法访问

1
2
3
4
5
6
7
8
9
10
11
function Test1() {
//
}

const obj1 = new Test1();

Test1.prototype = {
name: "hello world",
};

console.log(obj1.name); // undefined
缺点
  • 属性共享导致引用类型的修改反应在所有实例对象中
1
2
3
4
5
6
7
8
9
10
11
12
13
14
15
16
function Test1() {}

Test1.prototype.sayName = function () {
console.log(this.name.join(""));
};

Test1.prototype.name = ["name"];

const obj1 = new Test1();
const obj2 = new Test1();

obj1.name.push("test1");
obj1.sayName(); // nametest1

obj2.name.push("test2");
obj2.sayName(); // nametest1test2

组合构造函数和原型模式

1
2
3
4
5
6
7
8
9
10
11
12
13
function Test1(name) {
this.name = ["name", name];
}

Test1.prototype.sayName = function () {
console.log(this.name.join(""));
};

const obj1 = new Test1("test1");
const obj2 = new Test1("test2");

obj1.sayName(); // nametest1
obj2.sayName(); // nametest1

动态原型模式

创建对象时检查原型上是否存在对应属性,不存在就创建,存在就跳过

1
2
3
4
5
6
7
8
function Obj(name) {
this.name = name;
if (typeof this.sayName !== "function") {
this.sayName = function () {
console.log(this.name);
};
}
}

寄生构造函数

封装创建对象的过程,并返回创建的对象

1
2
3
4
5
6
7
8
9
10
11
function SArray() {
const arr = [];
arr.push.apply(arr, arguments);
arr.toPipeString = function () {
return this.join(";");
};
return arr;
}

const arr = new SArray(1, 2, 3);
console.log(arr.toPipeString()); // 1;2;3

稳妥构造函数

用闭包变量代替对象属性

1
2
3
4
5
6
7
8
9
10
function Obj(name) {
const o = {};
o.sayName = function () {
console.log(name);
};
return o;
}

const obj1 = new Obj("test1");
obj1.sayName(); // test1

继承

原型链继承

通过原型查找的方式实现继承

借用构造函数(伪造对象或经典继承)

在构造函数中通过 call 的方法调用父类的构造函数,无法复用方法属性等可以复用的属性

组合继承

在构造函数中通过 call 的方法调用父类的构造函数继承属性,通过原型链的方式继承方法属性

原型式继承

必须有一个对象作为另外一个对象的基础,Object.create 实现的原理

1
2
3
4
5
function object(o) {
function F() {}
F.prototype = o;
return new F();
}

寄生式继承

封装继承过程,并增强对象

1
2
3
4
5
6
7
function creatObj(obj) {
const clone = object(obj);
obj.sayHi = function () {
console.log("hello world");
};
return clone;
}

寄生组合式继承

通过增强对象的方法减少对父类构造函数的调用,减少多余属性的创建

1
2
3
4
5
function inheritPropetype+(sub,sup) {
const prop = object(sup.prorotype)
prop.constructor = sub
sup.prorotype = prop
}

js基础知识系列(五)

单体内置对象

Global 对象

定义

不属于任何对象的属性或方法

方法

  • isNaN
  • isFinite
  • paresInt
  • paresFloat

URI 编 / 解码方法

  • encodeURI 对整个 URI 进行编码,URI 本身的特殊字符不做处理
  • encodeURIComponent 只对 URI 中的部分字符做编码
  • decodeURI 对整个 URI 进行解码,URI 本身的特殊字符不做处理
  • decodeURIComponent 只对 URI 中的部分字符做解码
1
2
3
4
5
6
const uri = "https://www.baidu.com/illegal index.html#test"

encodeURI(uri) // https://www.baidu.com/illegal%20index.html#test
encodeURIComponent(uri) // https%3A%2F%2Fwww.baidu.com%2Fillegal%20index.html%23test
decodeURI(encodeURIComponent(uri)) // https%3A%2F%2Fwww.baidu.com%2Fillegal index.html%23test
decodeURIComponent(encodeURIComponent(uri)) // https://www.baidu.com/illegal index.html#test

eval 方法

eval 方法执行的代码包含本次调用的执行环境的一部分即被执行代码与当前代码有相同的作用域,相当于把代码执行结果插入当前位置,但是创建的函数或变量不会被提升

1
2
3
4
5
6
7
8
9
10
11
12
13
14
15
16
17
18
19
20
21
22
23
24
25
26
27
// 被执行代码与当前代码有相同的作用域
const test = {
t: 1,
test(){
eval("console.log(this)")
},
test1(){
console.log(this)
}
}

test.test1() // {t: 1, test: ƒ, test1: ƒ}
test.test2() // {t: 1, test: ƒ, test1: ƒ}

// 创建的函数或变量不会被提升
test() // test
test1() // Uncaught ReferenceError: test1 is not defined
function test() {
console.log("test")
}
eval("function test1(){console.log('test1')}")
test1() // test1

// 严格模式下无法访问 eval 中创建的变量或函数
'use strict'
eval("function test2(){console.log('test1')}")
test2() // Uncaught ReferenceError: test2 is not defined
严格模式下无法访问 eval 中创建的变量或函数

属性

属性 说明
undefined 特殊值
NaN 特殊值
Infinity 特殊值
Object 构造函数
Array 构造函数
Function 构造函数
Boolean 构造函数
String 构造函数
Number 构造函数
Date 构造函数
RegExp 构造函数
Error 构造函数
EvalError 构造函数
RageError 构造函数
ReferenceError 构造函数
SyntaxError 构造函数
TypeError 构造函数
URIError 构造函数

window 对象

web 浏览器把 Global 对象作为 window 的一部分来实现

通用获取 Global 对象

1
2
3
const global = (function () {
return this;
})(); // 函数表达式

Math 对象

属性

属性 说明
Math.E 自然对数的底数,即常量 e 的值
Math.LN10 10 的自然对数
Math.LOG2E 2 的自然对数
Math.LOG10E 以 2 为底 e 的对数
Math.PI 圆周率
Math.SQRT1_2 1/2 的平方根(即 2 的平方根的倒数)
Math.SQRT2 2 的平方根

方法

方法 说明
Math.min 最小值
Math.max 最大值
Math.ceil 向上取整
Math.floor 向下取整
Math.round 四舍五入
Math.random 0 到 1 随机数
Math.abs 绝对值
Math.exp Math.E 的次幂
Math.log 自然对数
Math.pow 次幂
Math.sqrt 平方根
Math.acos 反余弦
Math.asin 反正弦
Math.atan 反余切
Math.atan2(y / x) y/x 的反正切
Math.cos 余弦
Math.sin 正弦
Math.tan 正切

js基础知识系列(四)

字符串

创建自符串

  • 构造函数创建 new String('t')
  • 字面量创建 "t"
  • 使用函数转化为字符串 String("t")

区别

1
2
3
4
5
6
7
8
9
10
11
12
const t1 = new String("t")
const t2 = String("t")
const t3 = "t"

t1 === t2 // false
t1 === t3 // false
t3 === t2 // true

typeof t1 // "object"
typeof t2 // "string"
typeof t3 // "string"

上述代码可以看出 new String('t') 创建的是一个引用类型-对象,而 "t"String("t") 是一个基本类型-字符串,但是都具有字符串具有的属性

字符串方法

  • charAt(n) 返回字符串中第 n + 1 个单字符,若字符不存在则返回空字符串
  • charCodeAt(n) 返回字符串中第 n + 1 个单字符编码,若字符不存在则返回 NaN
  • concat(str) 拼接字符串,类似与 + 号,但 + 存在类型转化问题,concat(str) 调用时必须为字符串拼接其它类型,函数中其它类型会被强制转化为字符串
  • indexOf(str, n) 从第 n 位由左向右查找字符串,找到返回 index,没有找到返回 -1
  • lastIndexOf(str, n) 从第 n 位由右向左查找字符串,找到返回 index,没有找到返回 -1
  • trim() 去除字符串两边的空格
  • toLowerCase()toLocaleLowerCase() 字符串转化为小写,建议使用 toLocaleLowerCase() ,在某些语种下表现不一致
  • toUpperCase()toLocaleUpperCase() 字符串转化为大写,建议使用 toLocaleUpperCase() ,在某些语种下表现不一致
  • str1.localeCompare(str2),str1 排在 str2 之前返回负数,相同位置返回 0,之后返回正数,比较是拿 str1 字符串中的字符与 str2 的字符逐位相减
  • fromCharCode(num1,num2,...numn) 字符编码转化为字符串

slicesubstrsubstring 异同,以字符串 "123456" 为例

相同点

都是对字符串进行切割且不改变原有字符串,都接收一到两个参数,没有参数时都返回整个字符串

不同点
  • slice 参数为(起始位置,结束位置)
  • substr 参数为(起始位置,长度)
  • substring 参数为(起始位置,结束位置)
1
2
3
4
5
6
7
8
9
10
11
12
13
14
15
16
17
18
19
20
21
22
23
24
"123456".slice(3) // "456"
"123456".substr(3) // "456"
"123456".substring(3) // "456"

"123456".slice(9) // ""
"123456".substr(9) // ""
"123456".substring(9) // ""

"123456".slice(-2) // "56" 小于 0 从字符串长度 + 该值的位置开始计算
"123456".substr(-2) // "123456" 小于 0 从字符串起始位置开始计算
"123456".substring(-2) // "56" 小于 0 从字符串长度 + 该值的位置开始计算

"123456".slice(2,2) // "" (起始位置,结束位置)
"123456".substr(2,2) // "34" (起始位置,长度)
"123456".substring(2,2) // "" (起始位置,结束位置)


"123456".slice(2,1) // "" (起始位置,结束位置)
"123456".substr(2,1) // "3" (起始位置,长度)
"123456".substring(2,1) // "2" (起始位置,结束位置),把参数中较小的值作为起始位置

"123456".slice(2,-7) // "345" (起始位置,结束位置),小于0的值按照 N * len + n 的方式计算位置
"123456".substr(2,-7) // "" (起始位置,长度)
"123456".substring(2,-7) // "12" (起始位置,结束位置),把参数中较小的值作为起始位置且当起始位置小于0时按照0计算

字符串的匹配

  • match(regexp) 方法,类似于正则的 exec 方法,返回一个数组
  • search(regexp) 返回第一个匹配项的索引,未匹配到返回 -1
  • replace(regexp, replaceStr) 替换字符串
  • split(regexp) 分割字符串,返回数组
replace(regexp, replaceStr) 正则替换字符串
  • replaceStr 可以使用的特殊字符串
字符序列 替换文本
$$ $
$& 匹配整个模式的字符串
$' 匹配的子字符串之前的字符串
$` 匹配的子字符串之后的字符串
$n 匹配第 n 个捕获组的子字符串, n 范围 0 ~ 9
$nn 匹配第 nn 个捕获组的子字符串,nn 范围 01 ~ 99
  • replaceStr 为函数,类似于 function(match,pos,originalText),参数分别表示匹配项、匹配的位置、原始字符串

    1
    2
    3
    4
    5
    6
    7
    8
    9
    10
    11
    12
    function htmlEscape(text) {
    return text.replace(/[<>"&]/g, function(match, pos, originalText){
    switch(match) {
    case "<": return "&lt;";
    case ">": return "&gt;";
    case "&": return "&amp;";
    case "\"": return "&quot;";
    }
    })
    }

    htmlEscape("<h1 class=\"test\">test</h1>") // &lt;h1 class=&quot;test&quot;&gt;test&lt;/h1&gt;

typedoc源码阅读系列(二)

ChildableComponent 对象

1
2
3
4
5
6
7
8
9
10
11
12
13
14
15
16
17
18
19
20
21
22
23
24
25
26
27
28
29
30
31
32
33
34
35
36
37
38
39
40
41
42
43
44
45
46
47
48
49
50
51
52
53
54
55
56
57
58
59
60
61
62
63
64
65
66
67
68
/**
* 含有子组件的组件.
*
* @template O 组件的所有者
* @template C 包含的子组件
*/
export abstract class ChildableComponent<
O extends ComponentHost,
C extends Component
> extends AbstractComponent<O> {
/**
*子组件对象
*/
private _componentChildren?: { [name: string]: C };

// 默认组件
private _defaultComponents?: { [name: string]: ComponentClass<C> };

/**
* 创建新的组件
*/
constructor(owner: O | typeof DUMMY_APPLICATION_OWNER) {
super(owner);

// 遍历默认组件加入当前组件中作为子组件使用
_.entries(this._defaultComponents || {}).forEach(([name, component]) => {
this.addComponent(name, component);
});
}

/**
* 通过名称获取子组件
*/
getComponent(name: string): C | undefined {
return (this._componentChildren || {})[name];
}

// 获取全部子组件
getComponents(): C[] {
return _.values(this._componentChildren);
}

// 是否存在该组件
hasComponent(name: string): boolean {
return !!(this._componentChildren || {})[name];
}

// 新增组件,存在就返回已经存在的组件,不存在则添加,同时触发新增组件事件
addComponent<T extends C>(
name: string,
componentClass: T | ComponentClass<T, O>
): T {
// 1. 组件存在就直接返回
// 2. 组件未实例化则实例化,绑定到当前 this,已经实例化则直接保存
// 3. 触发组件添加事件
}

removeComponent(name: string): C | undefined {
// 1. 获取组件
// 2. 停止组件的事件监听
// 3. 从对象中删除组件
}

removeAllComponents() {
// 1. 遍历组件,停止事件监听
// 2. 组件对象清空
}
}

从上面的代码中可以看出此对象实现了 getComponentgetComponentshasComponentaddComponentremoveComponentremoveAllComponents方法,结合上一篇分析的 Application 对象看,Application调用的关于组件Component都在此对象中定义好了。此对象实现组件注册、查找、删除功能,按照KEY => Component 存放在对象中,便于快速查找和调用

AbstractComponent 对象

1
2
3
4
5
6
7
8
9
10
11
12
13
14
15
16
17
18
19
20
21
22
23
24
25
26
27
28
29
30
31
32
33
34
35
36
37
38
39
40
41
42
43
44
45
46
47
48
49
50
51
52
53
54
55
56
57
58
59
60
61
62
63
64
65
66
67
68
69
70
71
72
73
74
/**
* Component base class. Has an owner (unless it's the application root component),
* can dispatch events to its children, and has access to the root Application component.
*
* @template O type of component's owner.
*/
export abstract class AbstractComponent<O extends ComponentHost>
extends EventDispatcher
implements ComponentHost {
/**
* 所属对象
*/
private _componentOwner: O | typeof DUMMY_APPLICATION_OWNER;

/**
* 组件名称 @Component 装饰器设置.
*/
public componentName!: string;

/**
* 参数列表
*/
private _componentOptions?: DeclarationOption[];

constructor(owner: O | typeof DUMMY_APPLICATION_OWNER) {
super();
this._componentOwner = owner;
this.initialize();
}

/**
* 初始化
*/
protected initialize() {}

// 事件冒泡
protected bubble(name: Event | EventMap | string, ...args: any[]) {
super.trigger(name, ...args);

if (
this.owner instanceof AbstractComponent &&
this._componentOwner !== DUMMY_APPLICATION_OWNER
) {
this.owner.bubble(name, ...args);
}

return this;
}

/**
* 返回组件的所有参数生声明
*/
getOptionDeclarations(): DeclarationOption[] {
return (this._componentOptions || []).slice();
}

/**
* 返回根应用和组件
*/
get application(): Application {
return this._componentOwner === DUMMY_APPLICATION_OWNER
? ((this as any) as Application)
: this._componentOwner.application;
}

/**
* 组件所有者
*/
get owner(): O {
return this._componentOwner === DUMMY_APPLICATION_OWNER
? (this as any)
: this._componentOwner;
}
}

此对象保存了组件的参数、所属对象、组件名称,定义了事件冒泡的方式,定义了一个空的 initialize 方法,避免继承的对象没有实现此方法抛出异常

EventDispatcher 对象

1
2
3
4
5
6
7
8
9
10
11
12
13
14
15
16
17
18
19
20
21
22
23
24
25
26
27
28
29
30
31
32
33
34
35
36
37
38
39
40
41
42
43
44
45
46
47
48
49
50
51
52
53
54
55
56
57
58
59
60
61
62
63
64
65
66
67
68
69
70
71
72
73
74
75
76
77
78
79
80
81
82
83
84
85
86
87
88
89
90
91
92
93
94
95
96
97
98
99
100
101
102
103
104
105
106
107
108
109
110
111
112
113
114
115
116
117
118
119
120
121
122
123
124
125
126
127
128
129
130
131
132
133
134
135
136
137
138
139
140
141
142
143
144
145
146
147
148
149
150
151
152
153
154
155
156
157
158
159
160
161
162
163
164
165
166
167
168
169
170
171
172
173
174
175
176
177
178
179
180
181
182
183
184
185
186
187
188
189
190
191
192
193
194
195
196
197
198
199
200
201
202
203
204
205
206
207
208
209
210
211
212
213
214
215
216
217
218
219
220
221
222
223
224
225
226
227
228
229
230
/**
* 事件对象
*
* You may bind a callback to an event with `on` or remove with `off`;
* `trigger`-ing an event fires all callbacks in succession.
*/
export class EventDispatcher {
/**
* 注册的事件处理对象
*/
private _events?: EventHandlers;

/**
* Map of all objects this instance is listening to.
*/
private _listeningTo?: EventListeners;

/**
* Map of all objects that are listening to this instance.
*/
private _listeners?: EventListeners;

/**
* 唯一性 id
*/
private get _listenId(): string {
return this._savedListenId || (this._savedListenId = _.uniqueId("l"));
}
private _savedListenId?: string;

/**
* 绑定事件回调,类型为 all 时绑定所有事件
*/
on(
nameOrMap: EventMap | string,
callback: EventCallback,
context?: any,
priority?: number
) {
this.internalOn(nameOrMap, callback, context, priority);
return this;
}

/**
* Guard the `listening` argument from the public API.
*/
private internalOn(
name: EventMap | string,
callback: EventCallback | undefined,
context?: any,
priority: number = 0,
listening?: EventListener
) {
this._events = eventsApi(
onApi,
this._events || <EventHandlers>{},
name,
callback,
{
context: context,
ctx: this,
listening: listening,
priority: priority,
}
);

if (listening) {
const listeners = this._listeners || (this._listeners = {});
listeners[listening.id] = listening;
}
}

/**
* 只绑定一次事件
*/

once(
name: EventMap | string,
callback?: EventCallback,
context?: any,
priority?: number
) {
// Map the event into a `{event: once}` object.
const events = eventsApi(
onceMap,
<EventMap>{},
name,
callback,
_.bind(this.off, this)
);
return this.on(events, void 0, context, priority);
}

/**
* 移除事件回调
*/
off(name?: EventMap | string, callback?: EventCallback, context?: any) {
if (!this._events) {
return this;
}

this._events = eventsApi(offApi, this._events, name, callback, {
context: context,
listeners: this._listeners,
});

return this;
}

/**
* 监听其它对象的事件
*/
listenTo(
obj: EventDispatcher,
name: EventMap | string,
callback?: EventCallback,
priority?: number
) {
if (!obj) {
return this;
}
const id = obj._listenId;
const listeningTo = this._listeningTo || (this._listeningTo = {});
let listening = listeningTo[id];

// This object is not listening to any other events on `obj` yet.
// Setup the necessary references to track the listening callbacks.
if (!listening) {
const thisId = this._listenId;
listening = listeningTo[id] = {
obj: obj,
objId: id,
id: thisId,
listeningTo: listeningTo,
count: 0,
};
}

// Bind callbacks on obj, and keep track of them on listening.
obj.internalOn(name, callback, this, priority, listening);
return this;
}

/**
* 监听其它对象事件一次
*/
listenToOnce(
obj: EventDispatcher,
name: EventMap | string,
callback?: EventCallback,
priority?: number
) {
// Map the event into a `{event: once}` object.
const events = eventsApi(
onceMap,
<EventMap>{},
name,
callback,
_.bind(this.stopListening, this, obj)
);
return this.listenTo(obj, events, void 0, priority);
}

/**
* 停止监听事件
*/
stopListening(
obj?: EventDispatcher,
name?: EventMap | string,
callback?: EventCallback
) {
const listeningTo = this._listeningTo;
if (!listeningTo) {
return this;
}

const ids = obj ? [obj._listenId] : _.keys(listeningTo);
for (let i = 0; i < ids.length; i++) {
const listening = listeningTo[ids[i]];

// If listening doesn't exist, this object is not currently
// listening to obj. Break out early.
if (!listening) {
break;
}

listening.obj.off(name, callback, this);
}

if (_.isEmpty(listeningTo)) {
this._listeningTo = void 0;
}

return this;
}

/**
* 触发事件
*/
trigger(name: Event | EventMap | string, ...args: any[]) {
if (!this._events) {
return this;
}

if (name instanceof Event) {
triggerApi(
this._events,
name.name,
void 0,
[name],
(events: EventHandler[], args: any[]) => {
let ev: EventHandler,
i = -1,
l = events.length;
while (++i < l) {
if (name.isPropagationStopped) {
return;
}
ev = events[i];
ev.callback.apply(ev.ctx, args);
}
}
);
} else {
eventsApi(triggerApi, this._events, name, void 0, args);
}

return this;
}
}

定义了事件对象,监听一次、监听、取消监听、分发事件方法

  • _listenId 产生唯一性 id ,便于快速查找对应的对应的事件处理方法
  • trigger 触发事件,触发一个或多个事件
  • listenToOnce 监听事件一次
  • stopListening 停止监听事件,使用 id 快速定位事件处理函数
  • listenTo 多次监听事件
  • off 移除监听事件
  • once 绑定一个只会触发一次的事件
  • internalOn 派发事件对象
  • on 监听事件

待完成

整理实例化的 Application 具有的所有属性

typedoc源码阅读系列(一)

了解 typedoc

TypeDoc 是一款支持 TypeScript 的文档生成工具。

查看源码

查看文档

typedoc 运行流程

入口

查看 package.json 代码

1
2
3
4
5
6
7
8
{
...
"bin": {
"typedoc": "bin/typedoc"
}
...
}

执行了 bin/typedoc 这个文件

1
2
3
4
5
#!/usr/bin/env node

const td = require("../dist/lib/cli.js");
const app = new td.CliApplication();
app.bootstrap();

通过引入 ../dist/lib/cli.js ,实例化了 CliApplication 对象,经过分析发现,这个文件的源文件是 src/lib/cli.ts

1
2
3
4
5
6
7
8
9
10
11
12
13
14
15
16
17
18
19
20
21
22
23
24
25
26
27
28
29
30
31
32
33
34
35
36
37
38
39
40
41
42
43
44
45
46
47
48
49
import { Application } from "./application";
import { BindOption } from "./utils/options";
import { TypeDocAndTSOptions } from "./utils/options/declaration";

export const enum ExitCode {
OptionError = 1,
NoInputFiles = 2,
NoOutput = 3,
CompileError = 4,
OutputError = 5,
}

export class CliApplication extends Application {
@BindOption("out")
out!: string;

@BindOption("json")
json!: string;

@BindOption("version")
version!: boolean;

@BindOption("help")
help!: boolean;

/**
* Run TypeDoc from the command line.
*/
bootstrap(options?: Partial<TypeDocAndTSOptions>) {
// 其它代码
const result = super.bootstrap(options);
// 其它代码
const src = this.expandInputFiles(result.inputFiles);
const project = this.convert(src);
if (project) {
if (this.out) {
this.generateDocs(project, this.out);
}
if (this.json) {
this.generateJson(project, this.json);
}
if (!this.out && !this.json) {
this.generateDocs(project, "./docs");
}
}
// 其它代码
return result;
}
}

CliApplication 继承了 Application 对象,并且新增了 outjsonversionhelp等属性,实现了 bootstrap方法。

CliApplication 分析

bootstrap的实现

  • 调用父组件的 bootstrap 获取结果
  • 调用 expandInputFiles 获取输入的文件
  • 调用 convert 逐个转化需要转化的源文件,得到 project 对象
  • 调用 generateDocs 生成对应的输出文件
注:expandInputFilesconvertgenerateDocs通过继承的方式源自父类

父类 Application

1
2
3
4
5
6
7
8
9
10
11
12
13
14
15
16
17
18
19
20
21
22
23
24
25
26
27
28
29
30
31
32
33
34
35
36
37
38
39
40
41
42
43
44
45
46
47
48
49
50
51
52
53
54
55
56
57
58
59
60
61
62
63
64
65
66
67
68
69
70
71
72
73
74
75
76
77
78
79
80
81
82
83
84
85
86
87
88
89
90
91
92
93
94
95
96
97
98
99
100
101
102
103
104
105
106
107
108
109
110
111
112
113
114
115
116
117
118
119
120
121
122
123
124
125
126
127
128
129
130
131
132
133
134
135
136
137
138
139
140
141
142
143
144
145
146
147
148
149
150
151
152
153
154
155
156
157
158
159
160
161
162
163
164
165
166
167
168
169
170
171
172
173
174
175
176
177
178
export class Application extends ChildableComponent<
Application,
AbstractComponent<Application>
> {
/**
* The converter used to create the declaration reflections.
*/
converter: Converter;

/**
* The renderer used to generate the documentation output.
*/
renderer: Renderer;

/**
* The serializer used to generate JSON output.
*/
serializer: Serializer;

// 其它属性

/**
* Create a new TypeDoc application instance.
*
* @param options An object containing the options that should be used.
*/
constructor() {
super(DUMMY_APPLICATION_OWNER);

this.logger = new ConsoleLogger();
this.options = new Options(this.logger);
this.options.addDefaultDeclarations();
this.serializer = new Serializer();
this.converter = this.addComponent<Converter>("converter", Converter);
this.renderer = this.addComponent<Renderer>("renderer", Renderer);
this.plugins = this.addComponent("plugins", PluginHost);
}

/**
* Initialize TypeDoc with the given options object.
*
* @param options The desired options to set.
*/
bootstrap(
options: Partial<TypeDocAndTSOptions> = {}
): { hasErrors: boolean; inputFiles: string[] } {
// 日志相关配置

this.plugins.load();

this.options.reset();
this.options.setValues(options).mapErr((errors) => {
for (const error of errors) {
this.logger.error(error.message);
}
});
this.options.read(this.logger);

return {
hasErrors: this.logger.hasErrors(),
inputFiles: this.inputFiles,
};
}

/**
* Run the converter for the given set of files and return the generated reflections.
*
* @param src A list of source that should be compiled and converted.
* @returns An instance of ProjectReflection on success, undefined otherwise.
*/
public convert(src: string[]): ProjectReflection | undefined {
const result = this.converter.convert(src);
// 其它代码
return result.project;
}

/**
* Run the documentation generator for the given set of files.
*
* @param out The path the documentation should be written to.
* @returns TRUE if the documentation could be generated successfully, otherwise FALSE.
*/
public generateDocs(
input: ProjectReflection | string[],
out: string
): boolean {
const project =
input instanceof ProjectReflection ? input : this.convert(input);

out = Path.resolve(out);
this.renderer.render(project, out);
}

/**
* Run the converter for the given set of files and write the reflections to a json file.
*
* @param out The path and file name of the target file.
* @returns TRUE if the json file could be written successfully, otherwise FALSE.
*/
public generateJson(
input: ProjectReflection | string[],
out: string
): boolean {
const project =
input instanceof ProjectReflection ? input : this.convert(input);
if (!project) {
return false;
}

out = Path.resolve(out);
const eventData = {
outputDirectory: Path.dirname(out),
outputFile: Path.basename(out),
};
const ser = this.serializer.projectToObject(project, {
begin: eventData,
end: eventData,
});
writeFile(out, JSON.stringify(ser, null, "\t"), false);

return true;
}

/**
* Expand a list of input files.
*
* Searches for directories in the input files list and replaces them with a
* listing of all TypeScript files within them. One may use the ```--exclude``` option
* to filter out files with a pattern.
*
* @param inputFiles The list of files that should be expanded.
* @returns The list of input files with expanded directories.
*/
public expandInputFiles(inputFiles: string[] = []): string[] {
const files: string[] = [];

const exclude = this.exclude ? createMinimatch(this.exclude) : [];

function isExcluded(fileName: string): boolean {
return exclude.some((mm) => mm.match(fileName));
}

const supportedFileRegex = this.options.getCompilerOptions().allowJs
? /\.[tj]sx?$/
: /\.tsx?$/;
function add(file: string, entryPoint: boolean) {
let stats: FS.Stats;
try {
stats = FS.statSync(file);
} catch {
// No permission or a symbolic link, do not resolve.
return;
}
const fileIsDir = stats.isDirectory();
if (fileIsDir && !file.endsWith("/")) {
file = `${file}/`;
}

if ((!fileIsDir || !entryPoint) && isExcluded(file.replace(/\\/g, "/"))) {
return;
}

if (fileIsDir) {
FS.readdirSync(file).forEach((next) => {
add(Path.join(file, next), false);
});
} else if (supportedFileRegex.test(file)) {
files.push(file);
}
}

inputFiles.forEach((file) => {
add(Path.resolve(file), true);
});

return files;
}
}

通过上面代码的分析可以梳理出调用流程

  1. 类初始化时,依次注入 serializerconverterrendererplugins等属性。serializer 序列化输入数据成 JSON 格式;converter 创建映射对象;renderer 主要是控制文档数据的输出;plugins 数据转化过程中执行的一系列插件,主要是对映射对象进行操作。
  2. bootstrap 是整个流程的调用入口,主要用途是加载插件和重置参数,返回一个包含错误信息和输入文件列表的对象
  3. convert 函数主要作用就是调用 converter 属性中的 convert 创建映射对象并返回映射对象
  4. generateDocs 生成文档文件
  5. generateJson 生成 JSON 文件
  6. expandInputFiles 过滤输入的文件,返回需要转化的全部文件完整列表

待完成

serializerconverterrendererplugins 等对象实现细节解析

附件

gulp打包

项目初始化

  • 在文件夹下执行 npm init,一直回车,最后输入 yes即可创建模板文件

  • 执行 npm install --save-dev gulp gulp-copy 安装 gulp 依赖

  • 执行 npm install -save-dev typescript gulp-typescript @babel/preset-typescript 安装 typescript 相关依赖把 ts 编译为 js

  • 执行 npm install -save-dev @babel/core @babel/preset-env @babel/preset-react gulp-babel 安装 babel 相关依赖

  • 执行 npm install react react-dom 安装 react 相关依赖

  • 配置babel,参考 babel 网站,项目简单配置如下

    1
    2
    3
    4
    5
    6
    7
    {
    "presets": [
    "@babel/preset-env",
    "@babel/preset-react",
    "@babel/preset-typescript"
    ]
    }
  • 配置 gulpfile 文件,参考 gulp 官网,项目简单配置如下

    1
    2
    3
    4
    5
    6
    7
    8
    9
    10
    11
    12
    13
    14
    15
    16
    17
    18
    19
    20
    21
    22
    23
    24
    const gulp = require("gulp");
    const babel = require("gulp-babel");
    const ts = require("gulp-typescript");
    const copy = require("gulp-copy");
    const tsProject = ts.createProject("./tsconfig.json");

    gulp.task("tsx", function () {
    return gulp
    .src(["src/**/*.ts", "src/**/*.tsx"])
    .pipe(tsProject())
    .pipe(gulp.dest("./temp"));
    });

    gulp.task("js", function () {
    return gulp.src(["temp/**/*.js"]).pipe(babel()).pipe(gulp.dest("./lib"));
    });

    gulp.task("declare", function () {
    return gulp
    .src(["temp/**/*.d.ts"])
    .pipe(copy("./lib", { prefix: 1 }))
    .pipe(gulp.dest("./lib"));
    });
    gulp.task("default", gulp.series("tsx", gulp.parallel("js", "declare")));
  • package.json 加入相关命令,文件内容如下

    1
    2
    3
    4
    5
    6
    7
    8
    9
    10
    11
    12
    13
    14
    15
    16
    17
    18
    19
    20
    21
    22
    23
    24
    25
    26
    27
    {
    "name": "test",
    "version": "1.0.0",
    "description": "",
    "main": "index.js",
    "scripts": {
    "build": "gulp -f ./gulpfile.js",
    "test": "echo \"Error: no test specified\" && exit 1"
    },
    "author": "",
    "license": "ISC",
    "devDependencies": {
    "@babel/core": "^7.9.0",
    "@babel/preset-env": "^7.9.5",
    "@babel/preset-react": "^7.9.4",
    "@babel/preset-typescript": "^7.9.0",
    "gulp": "^4.0.2",
    "gulp-babel": "^8.0.0-beta.2",
    "gulp-copy": "^4.0.1",
    "gulp-typescript": "^6.0.0-alpha.1",
    "typescript": "^3.8.3"
    },
    "dependencies": {
    "react": "^16.13.1",
    "react-dom": "^16.13.1"
    }
    }

项目文件目录

1
2
3
4
5
6
+ src/              // 源文件目录
|--- index.tsx // 打包源文件
+ .babelrc // babel 配置文件
+ gulpfile.js // gulp 配置文件
+ package.json // 项目配置文件
+ tsconfig.json // ts 配置文件

参考链接

iOS模拟器

mac 上 ios 模拟器调试开发

准备

  • mac 电脑
  • xcode 10.X
  • ios 应用模拟器安装包

新建工程

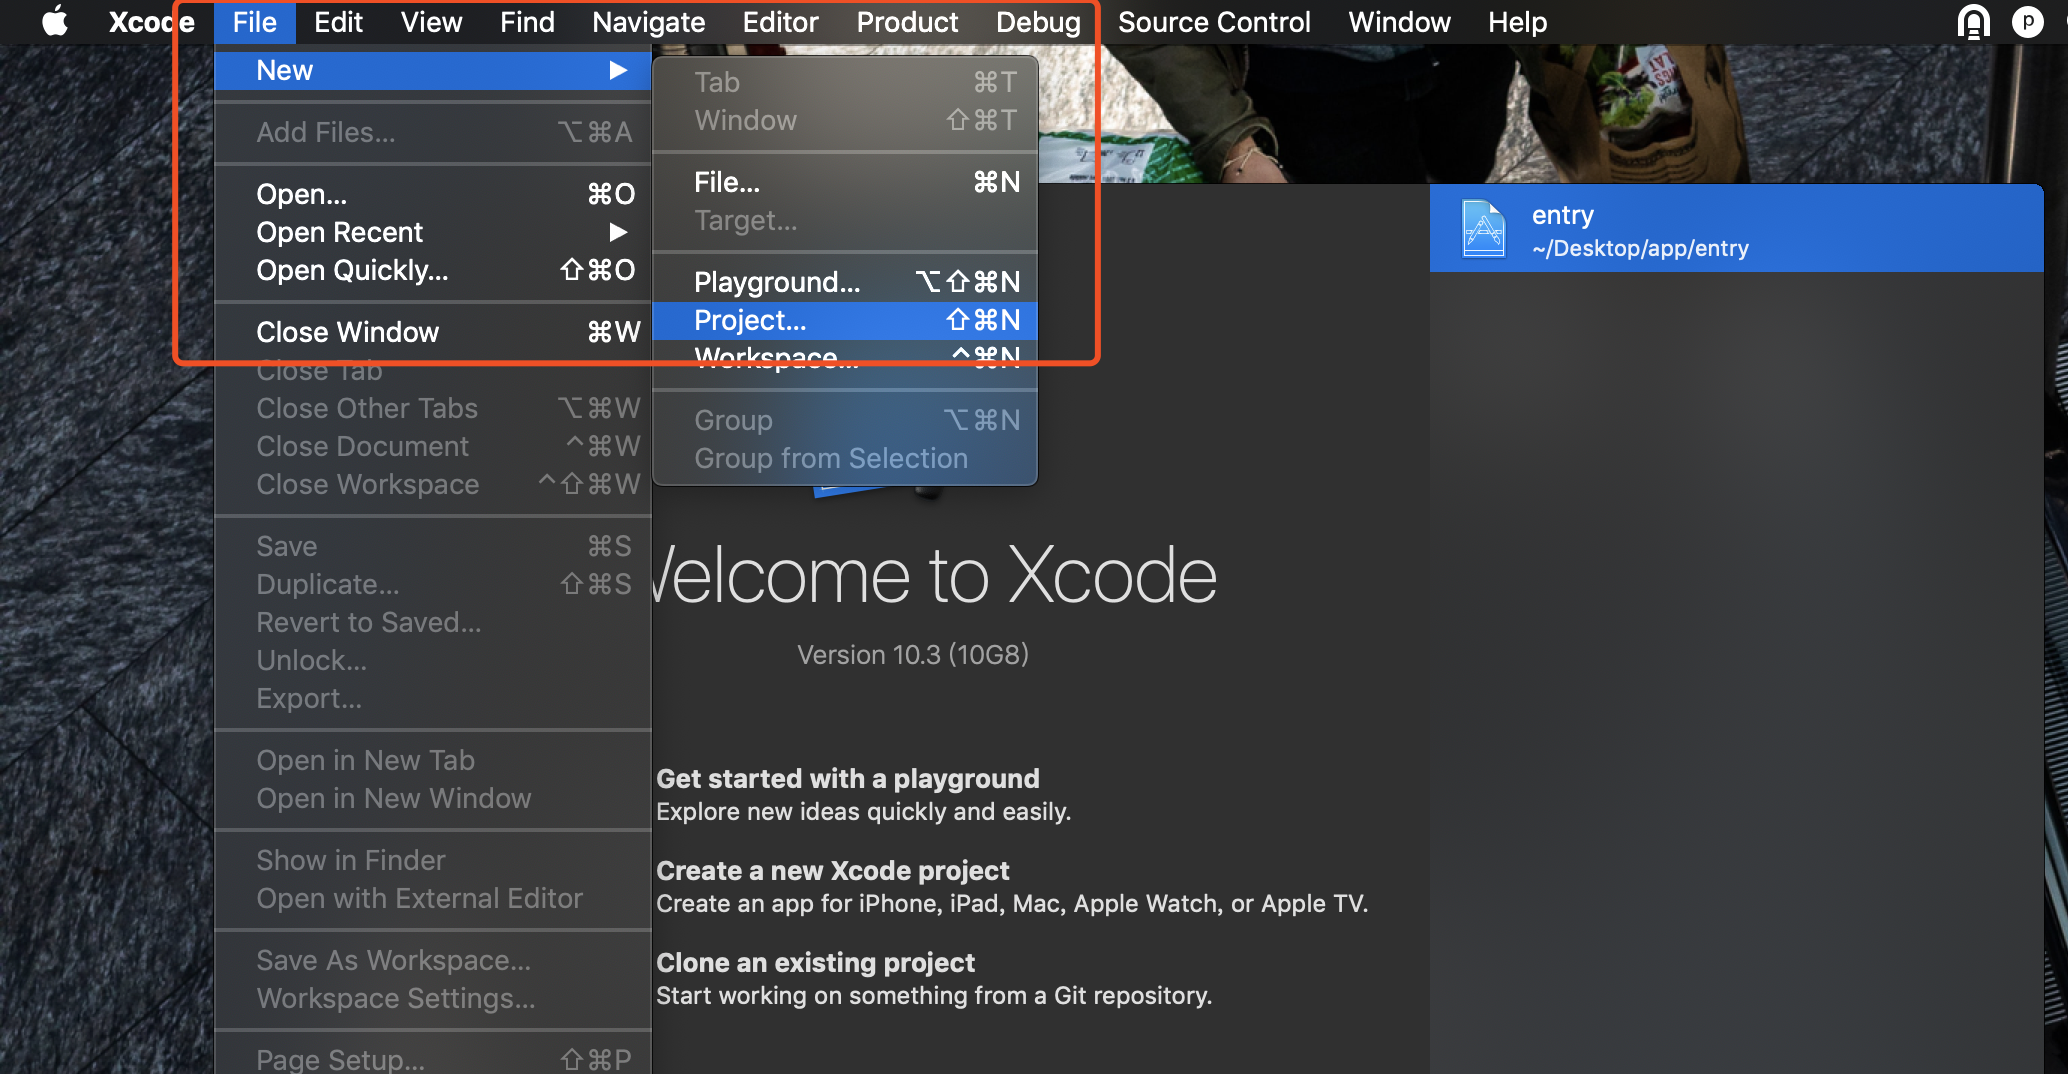
  • 打开 xcode 软件

  • 新建工程

    新建工程

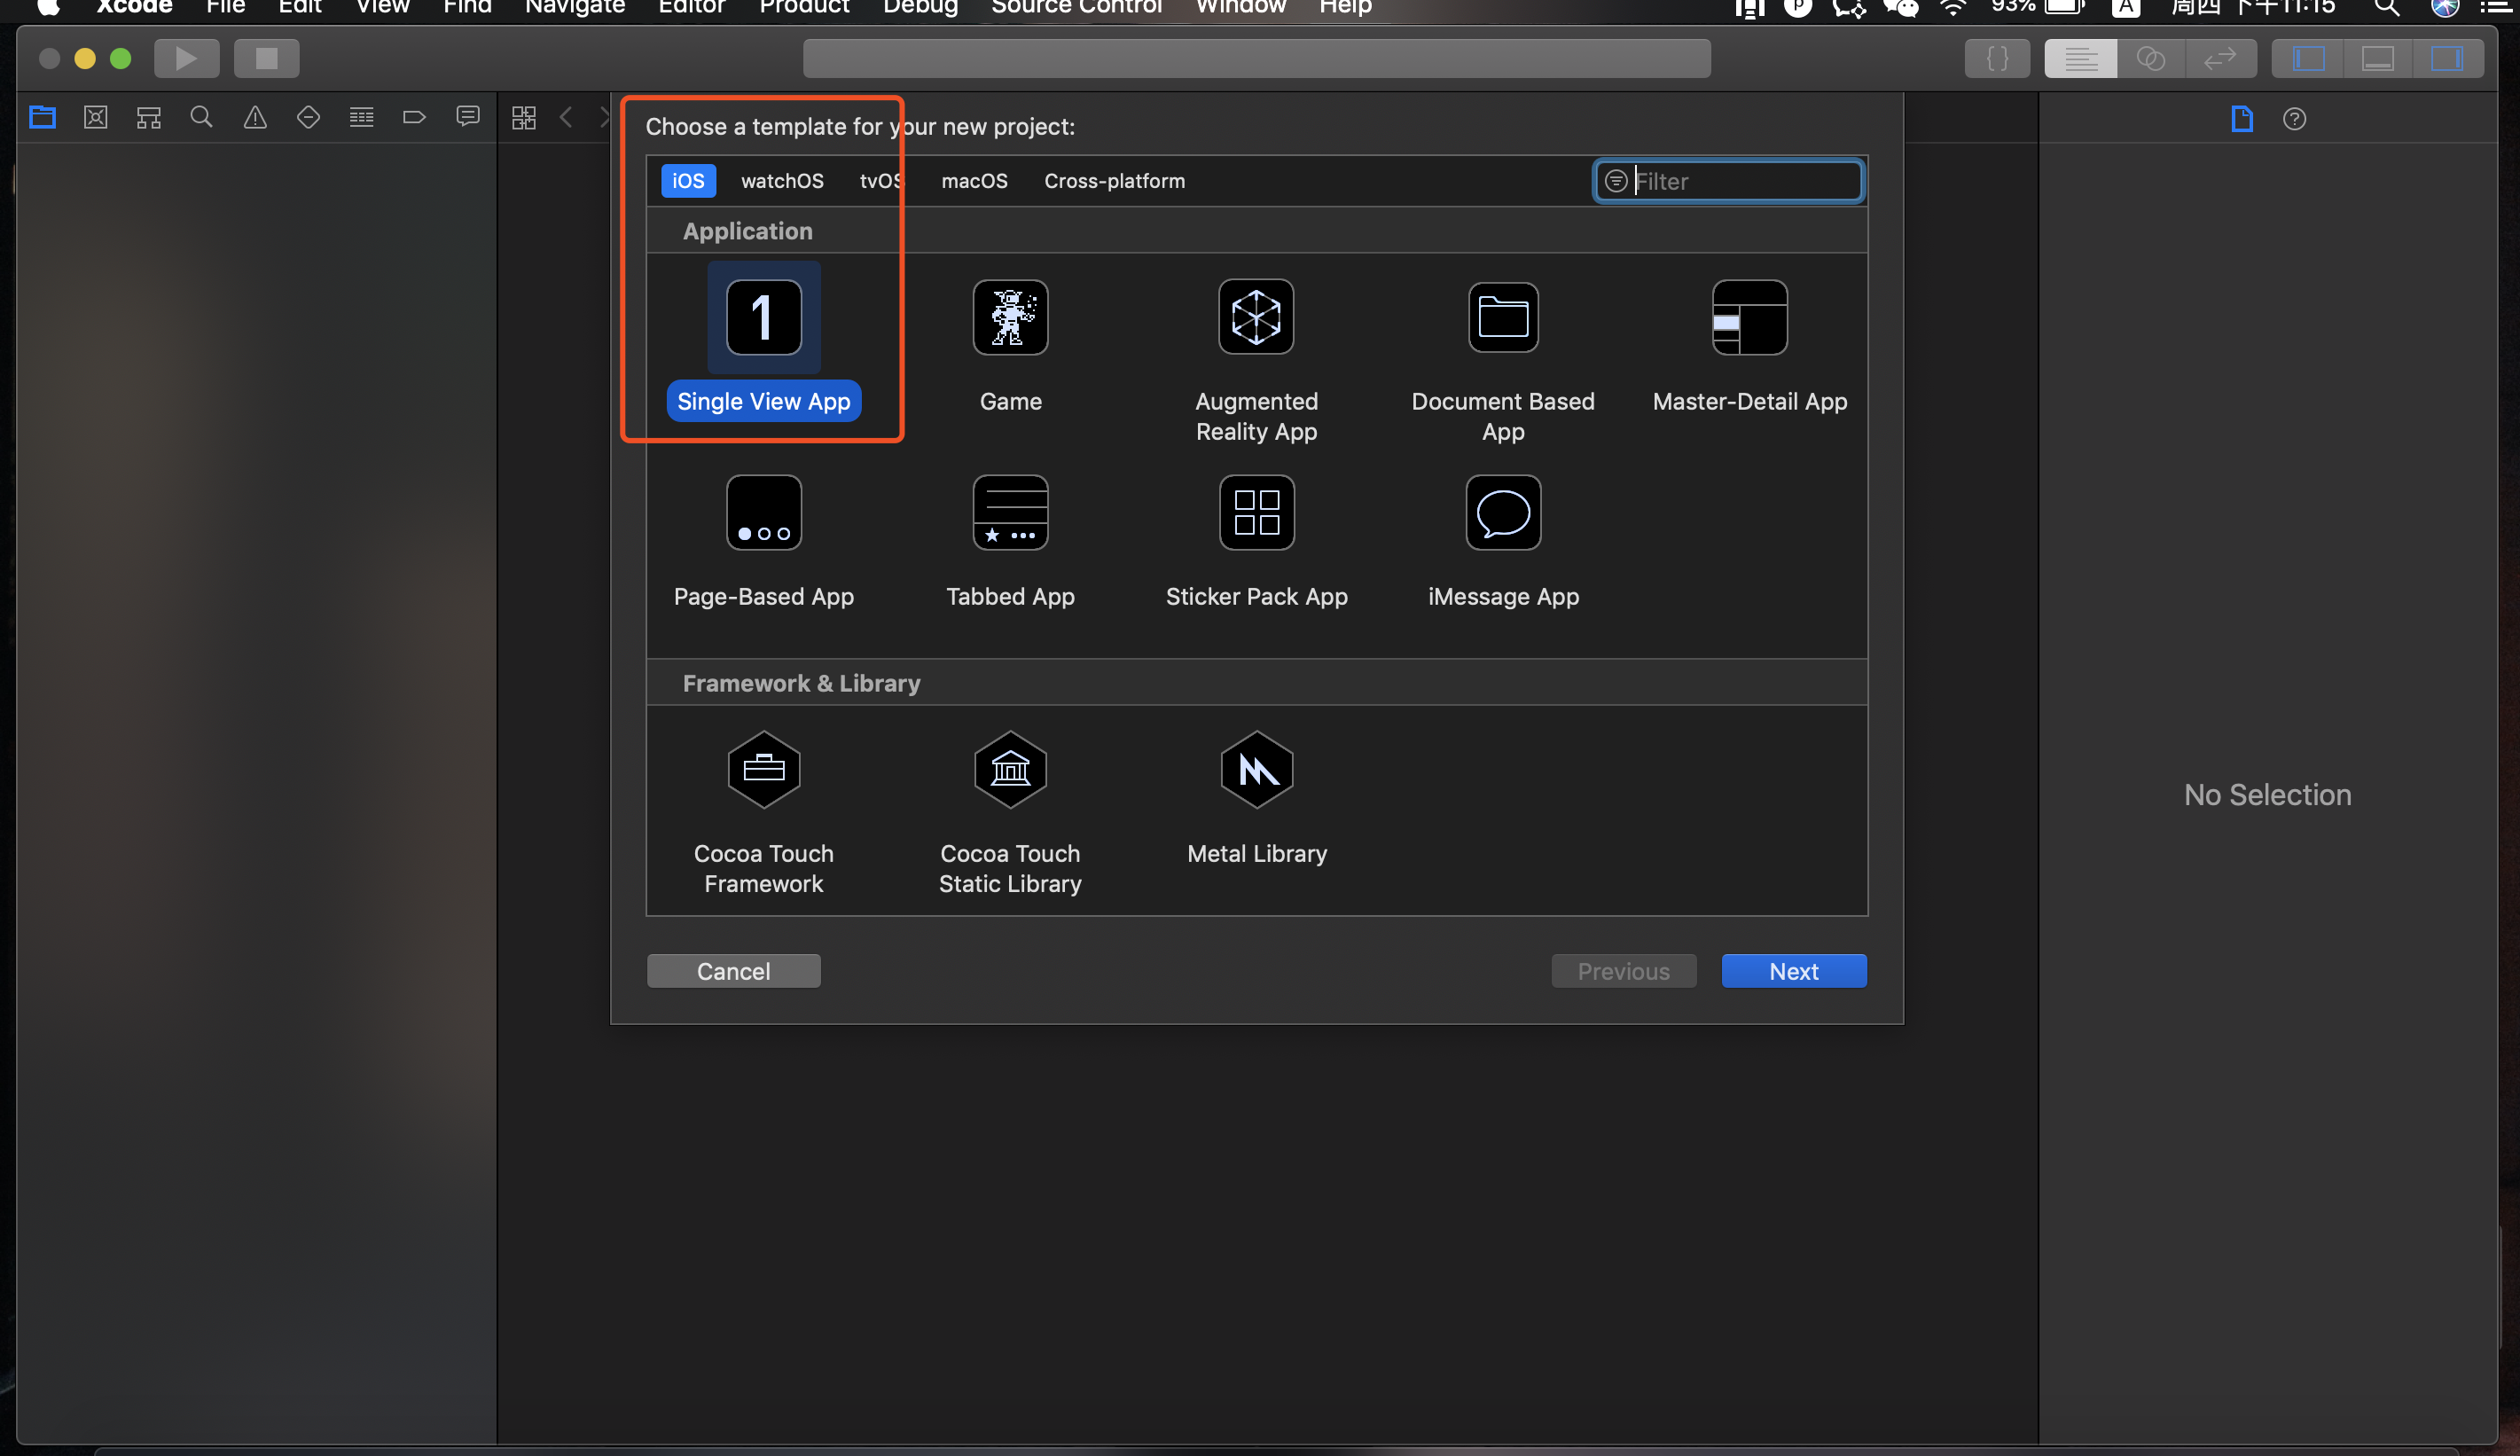
  • 选择默认的应用类型

    选择默认的应用类型

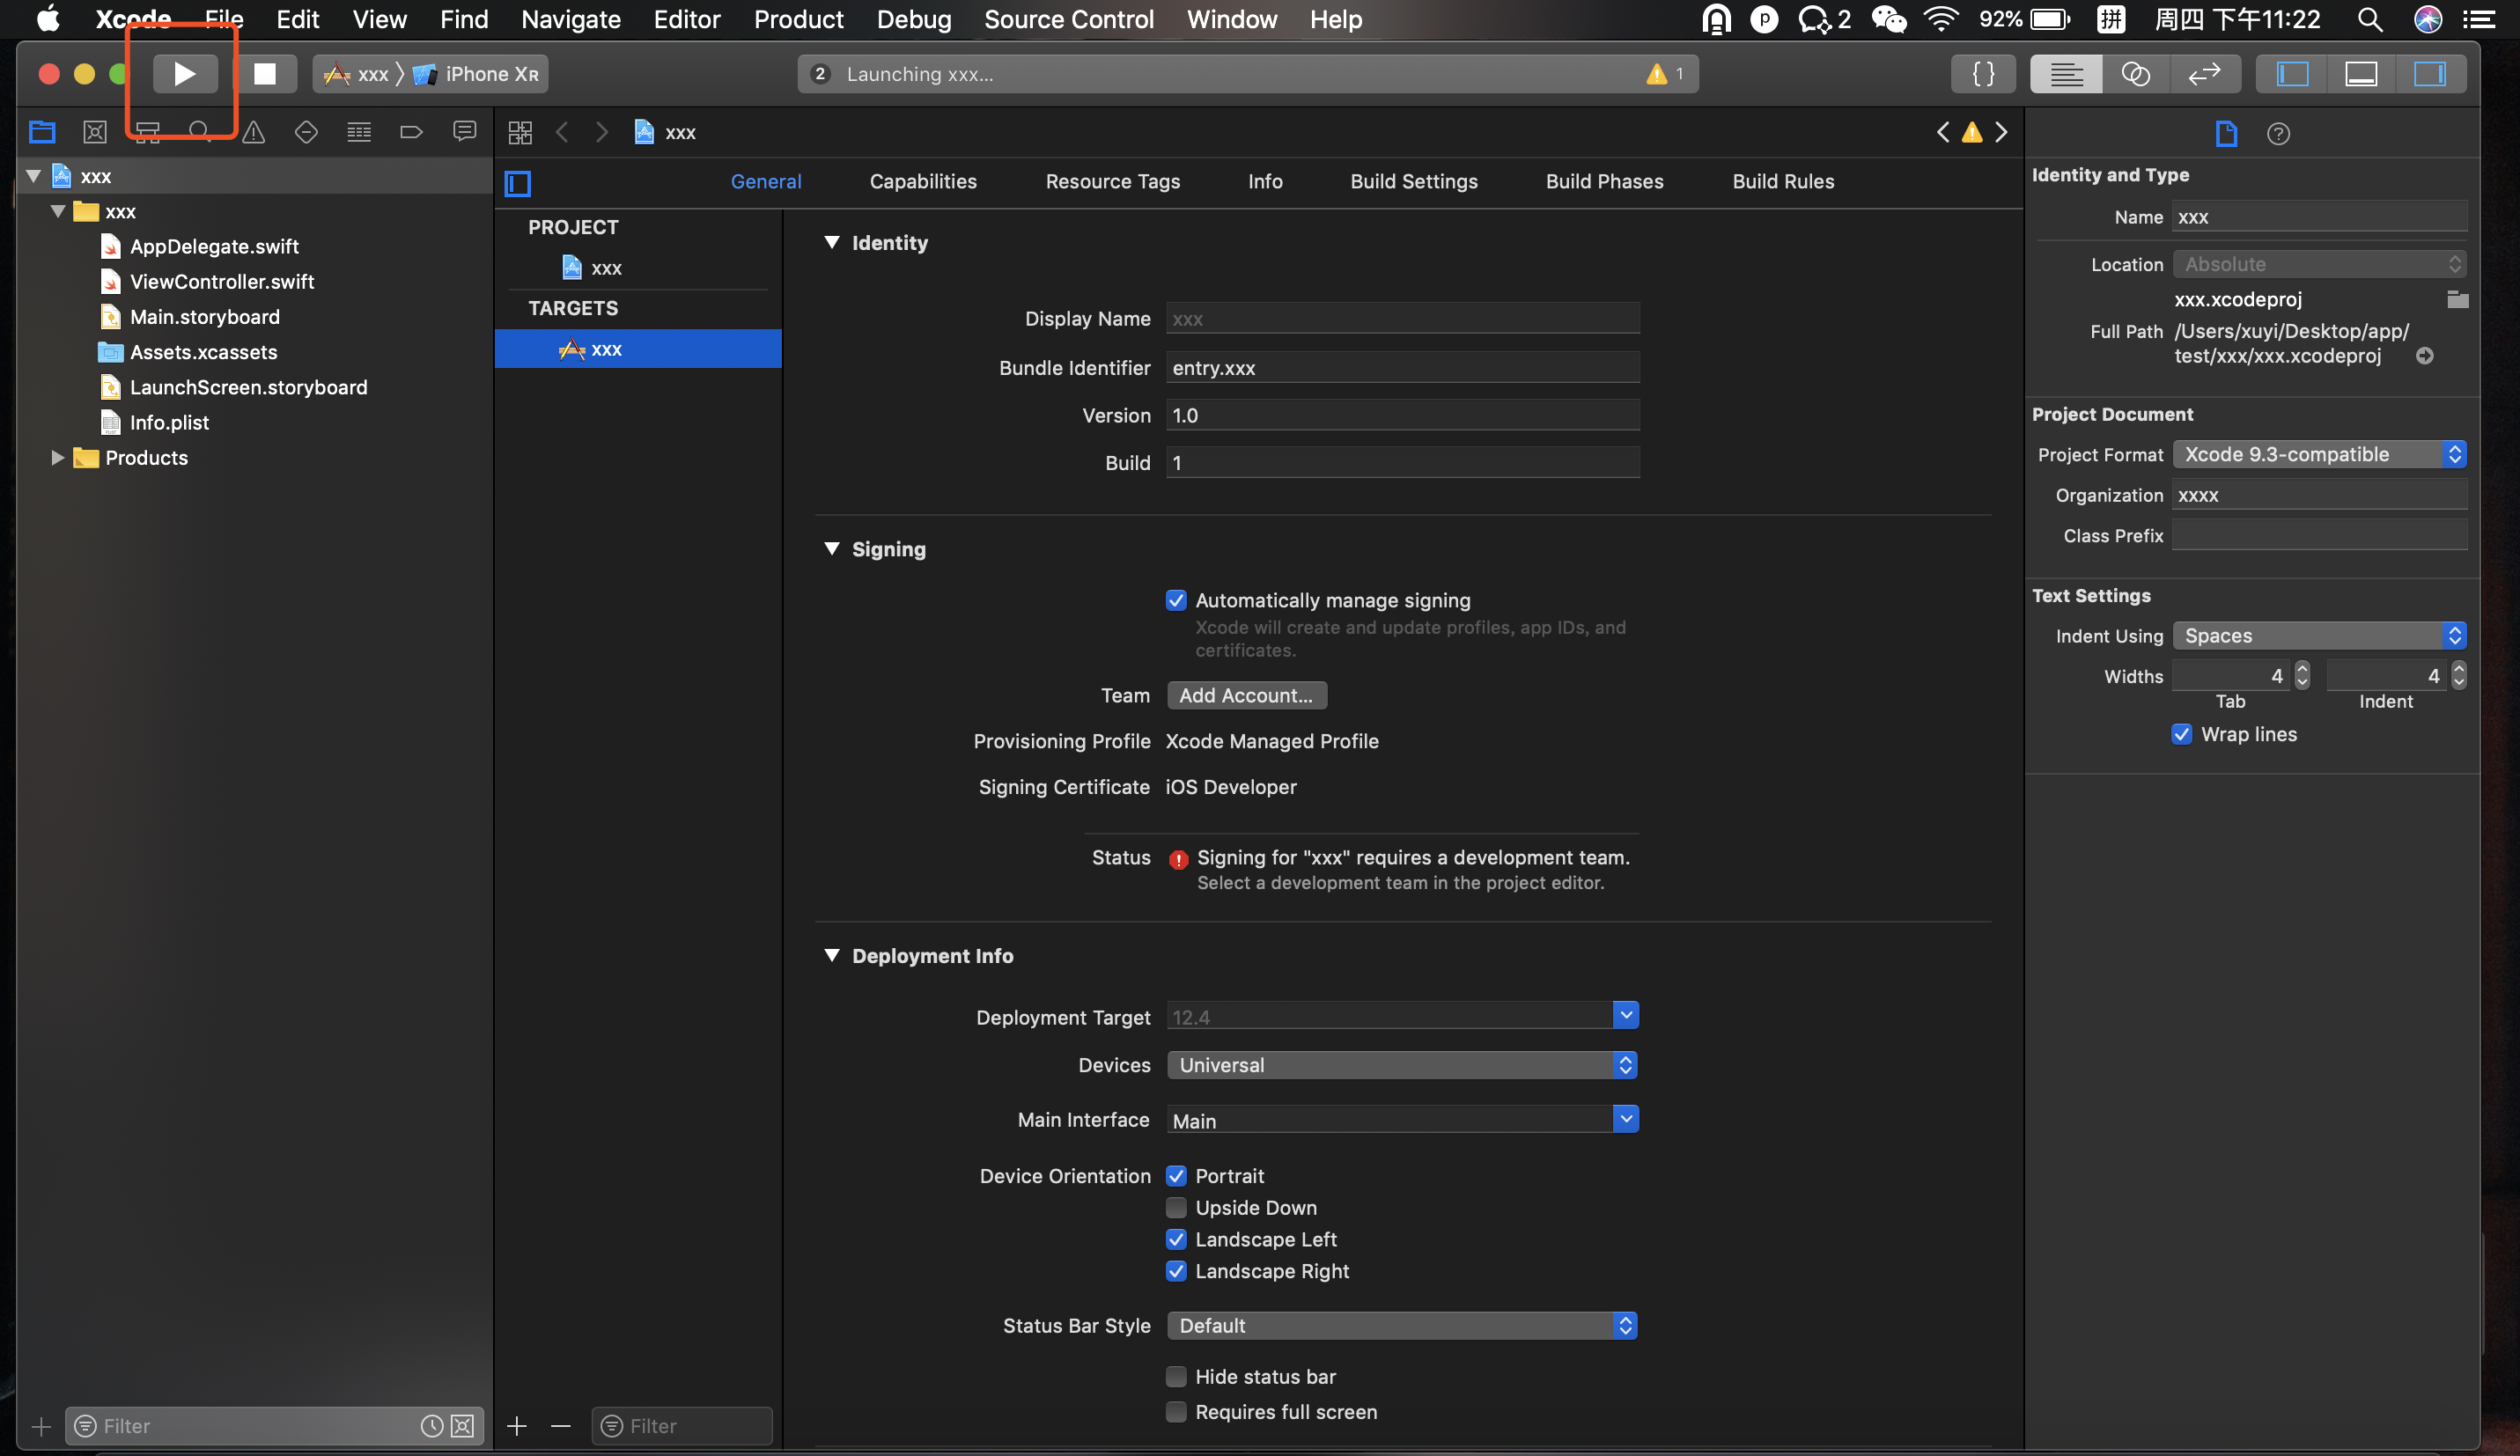
  • 设置工程名称和路径

    设置工程名称和路径

  • 点击 next 选择项目保存路径

  • 点击构建启动模拟器

    点击构建启动模拟器

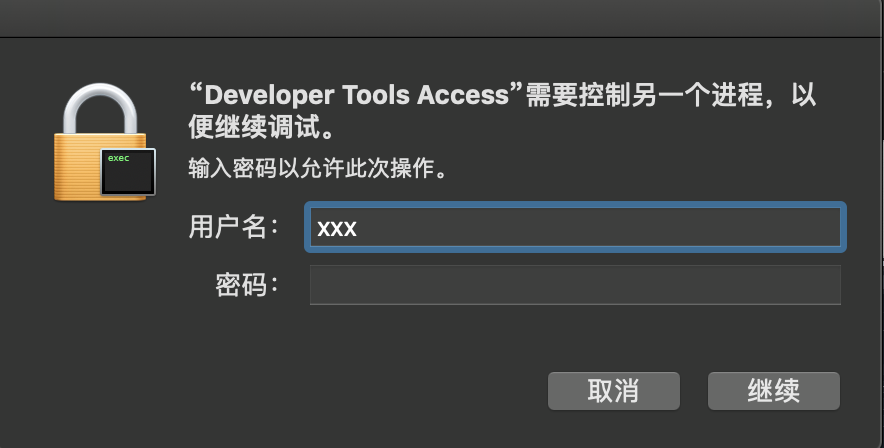
  • 若系统弹出如下弹窗提示需要授权,输入电脑开机密码授权就可以了

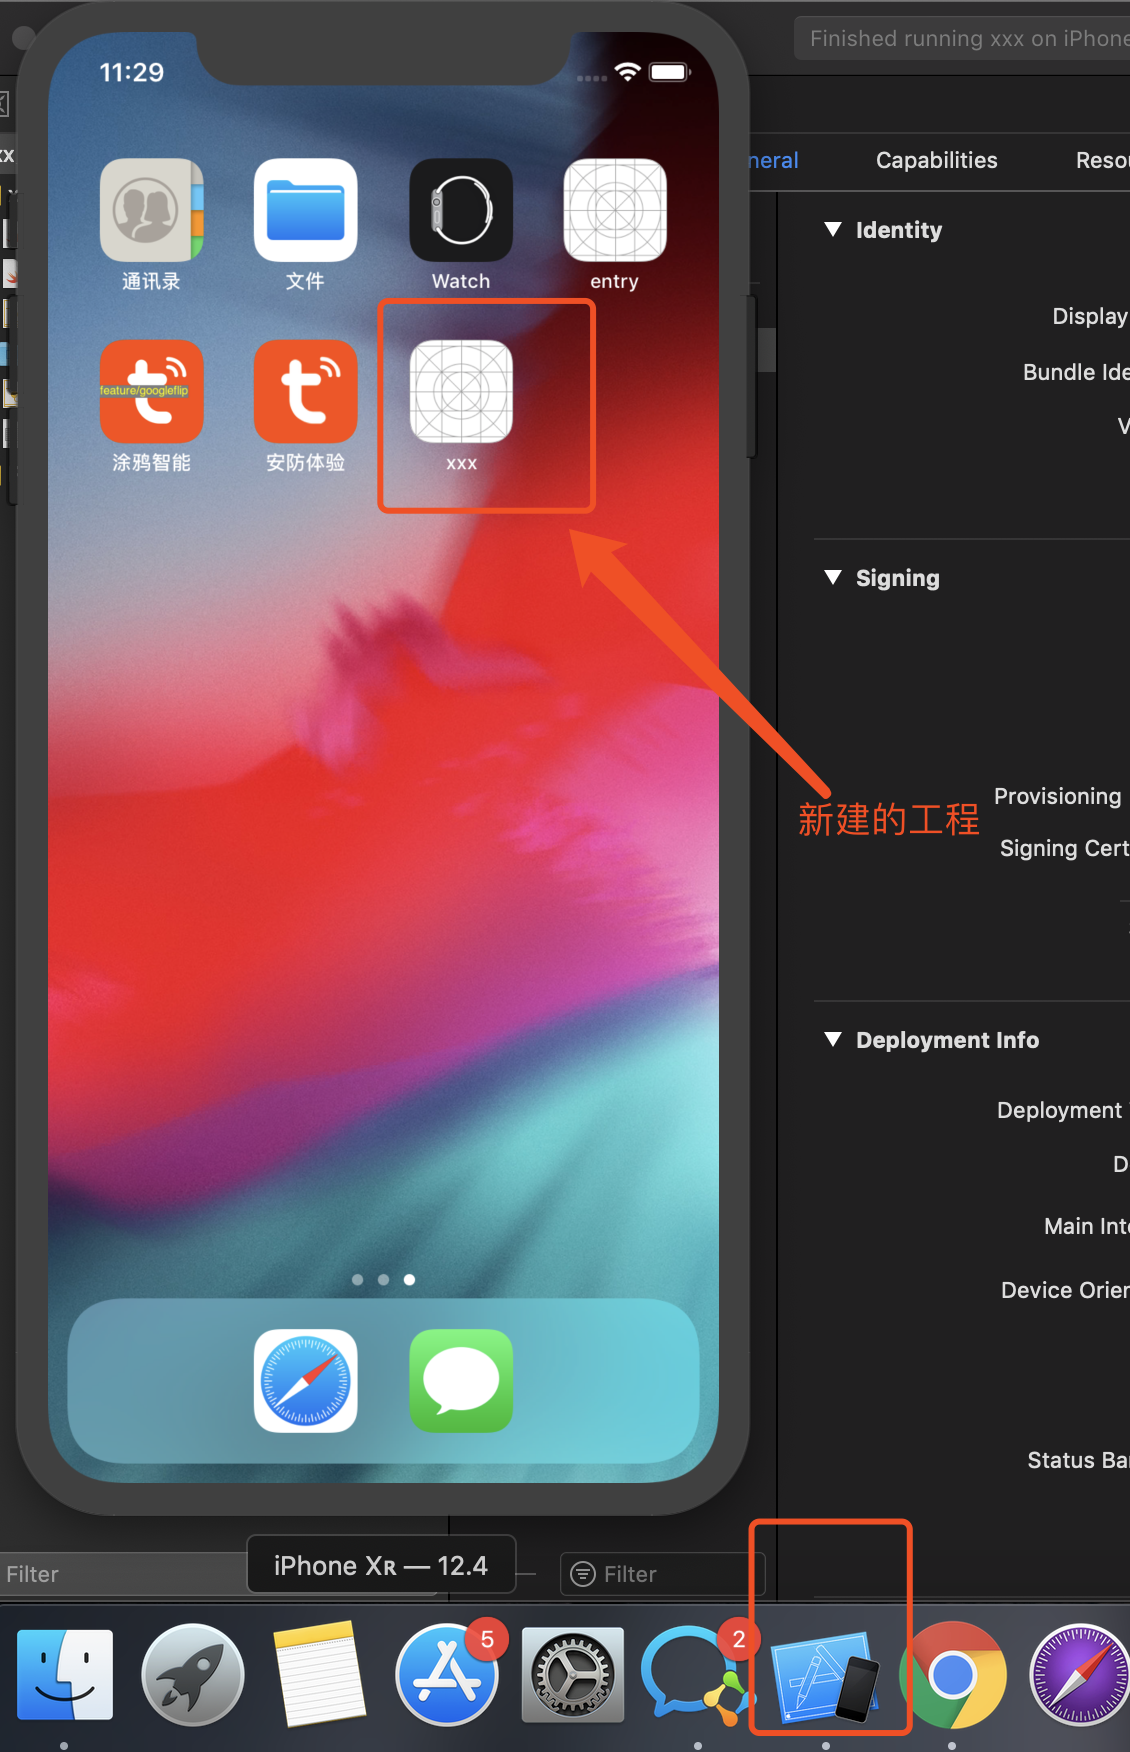
  • 最后在程序坞中会出现如下图标,并在屏幕上显示模拟器

安装模拟器

以涂鸦模拟器包为例

  • 把你的模拟器包拖到模拟器中(即下图的屏幕中)安装应用

  • 安装成功之后会在屏幕中显示应用的图标

在模拟器里调试

safari 浏览器准备

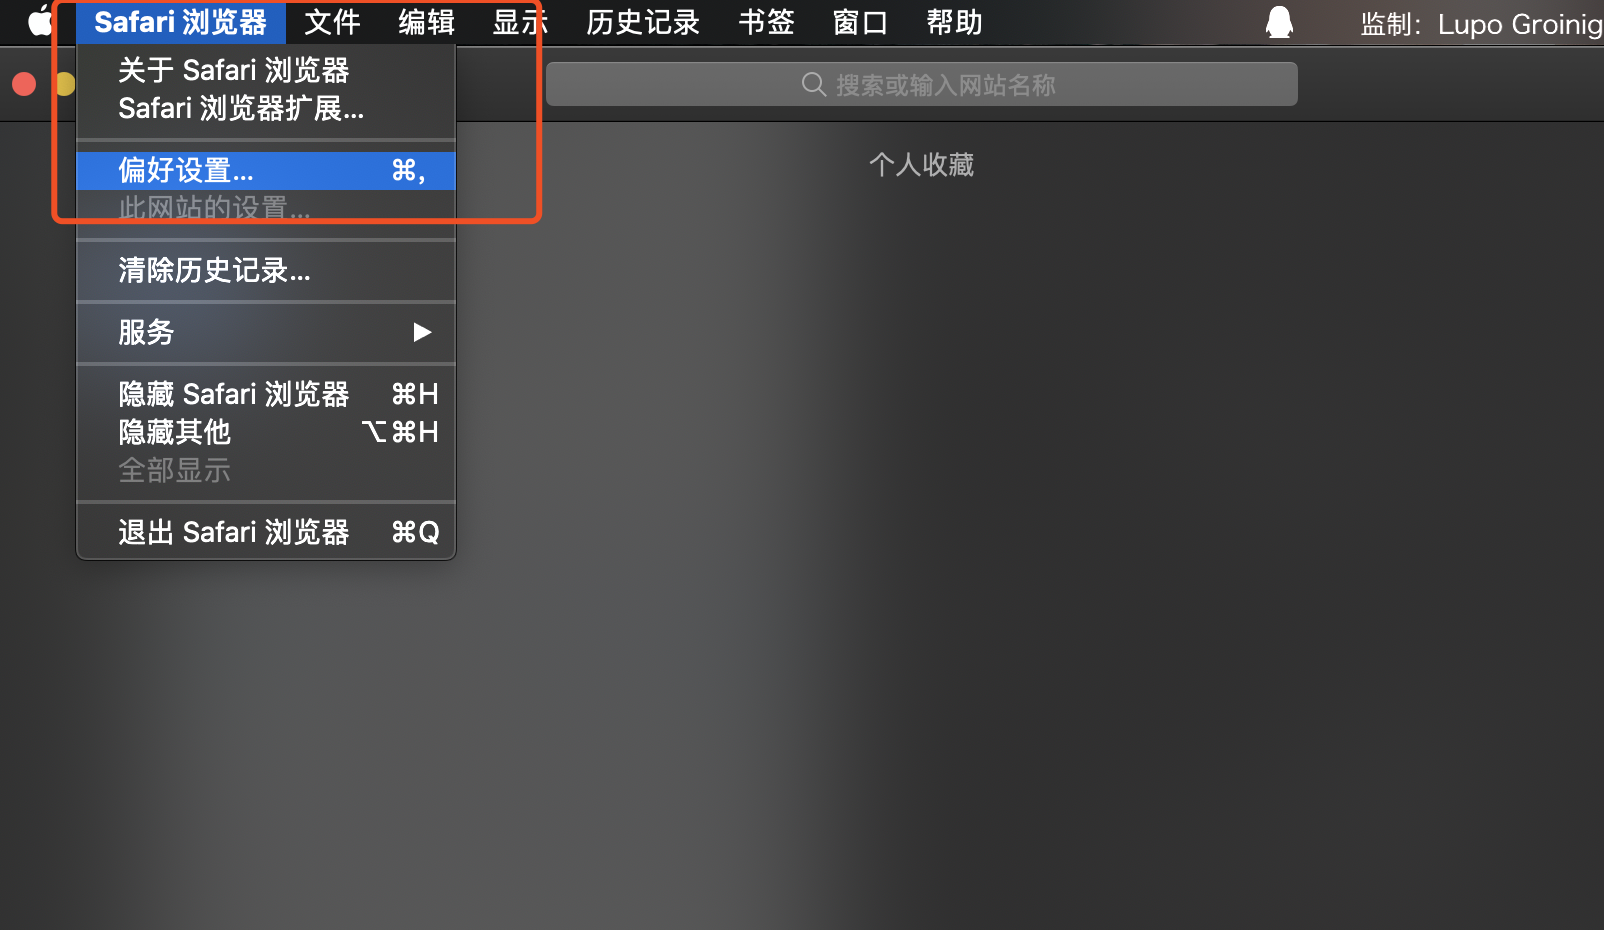
  • 打开 safari,在菜单栏找到 safari浏览器 中的 偏好设置

    偏好设置

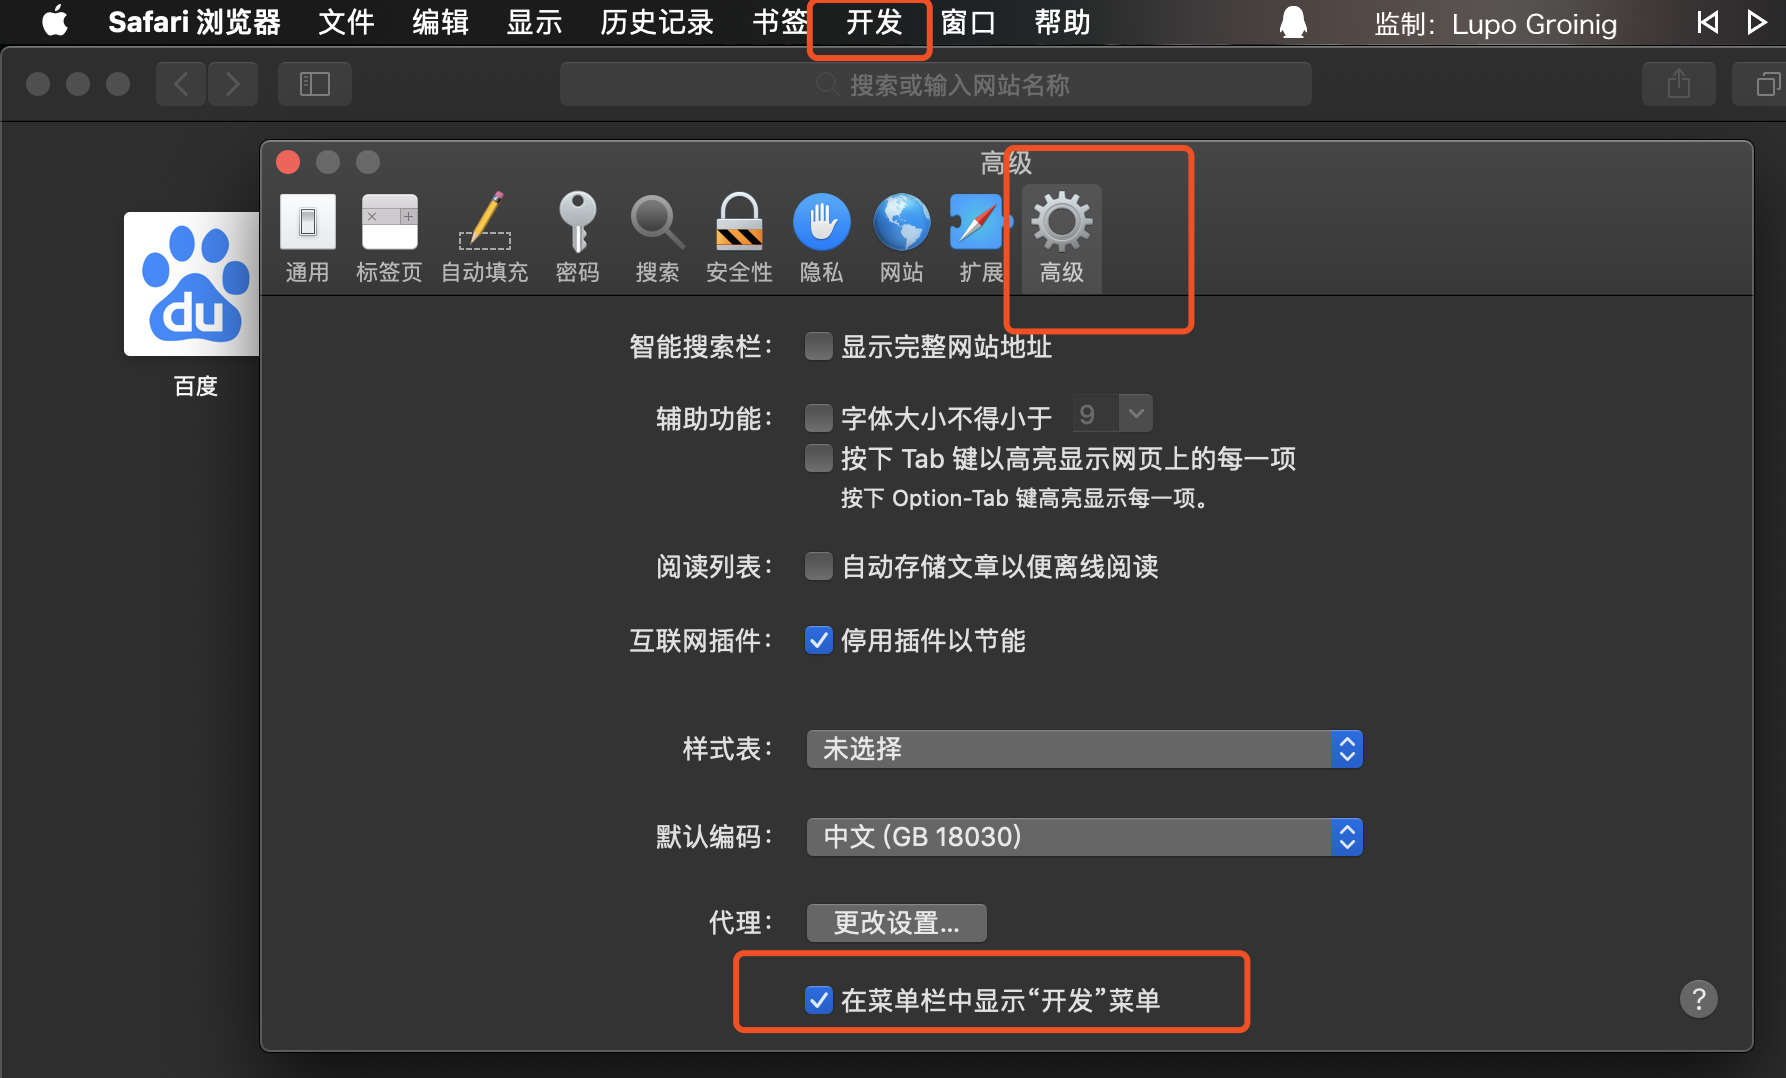
  • 高级 设置中勾选 在菜单栏中显示“开发”菜单 就可以在菜单栏中显示开发菜单了

    开发菜单

开始调试应用中的 h5 页面

  • 打开应用中的 h5 页面

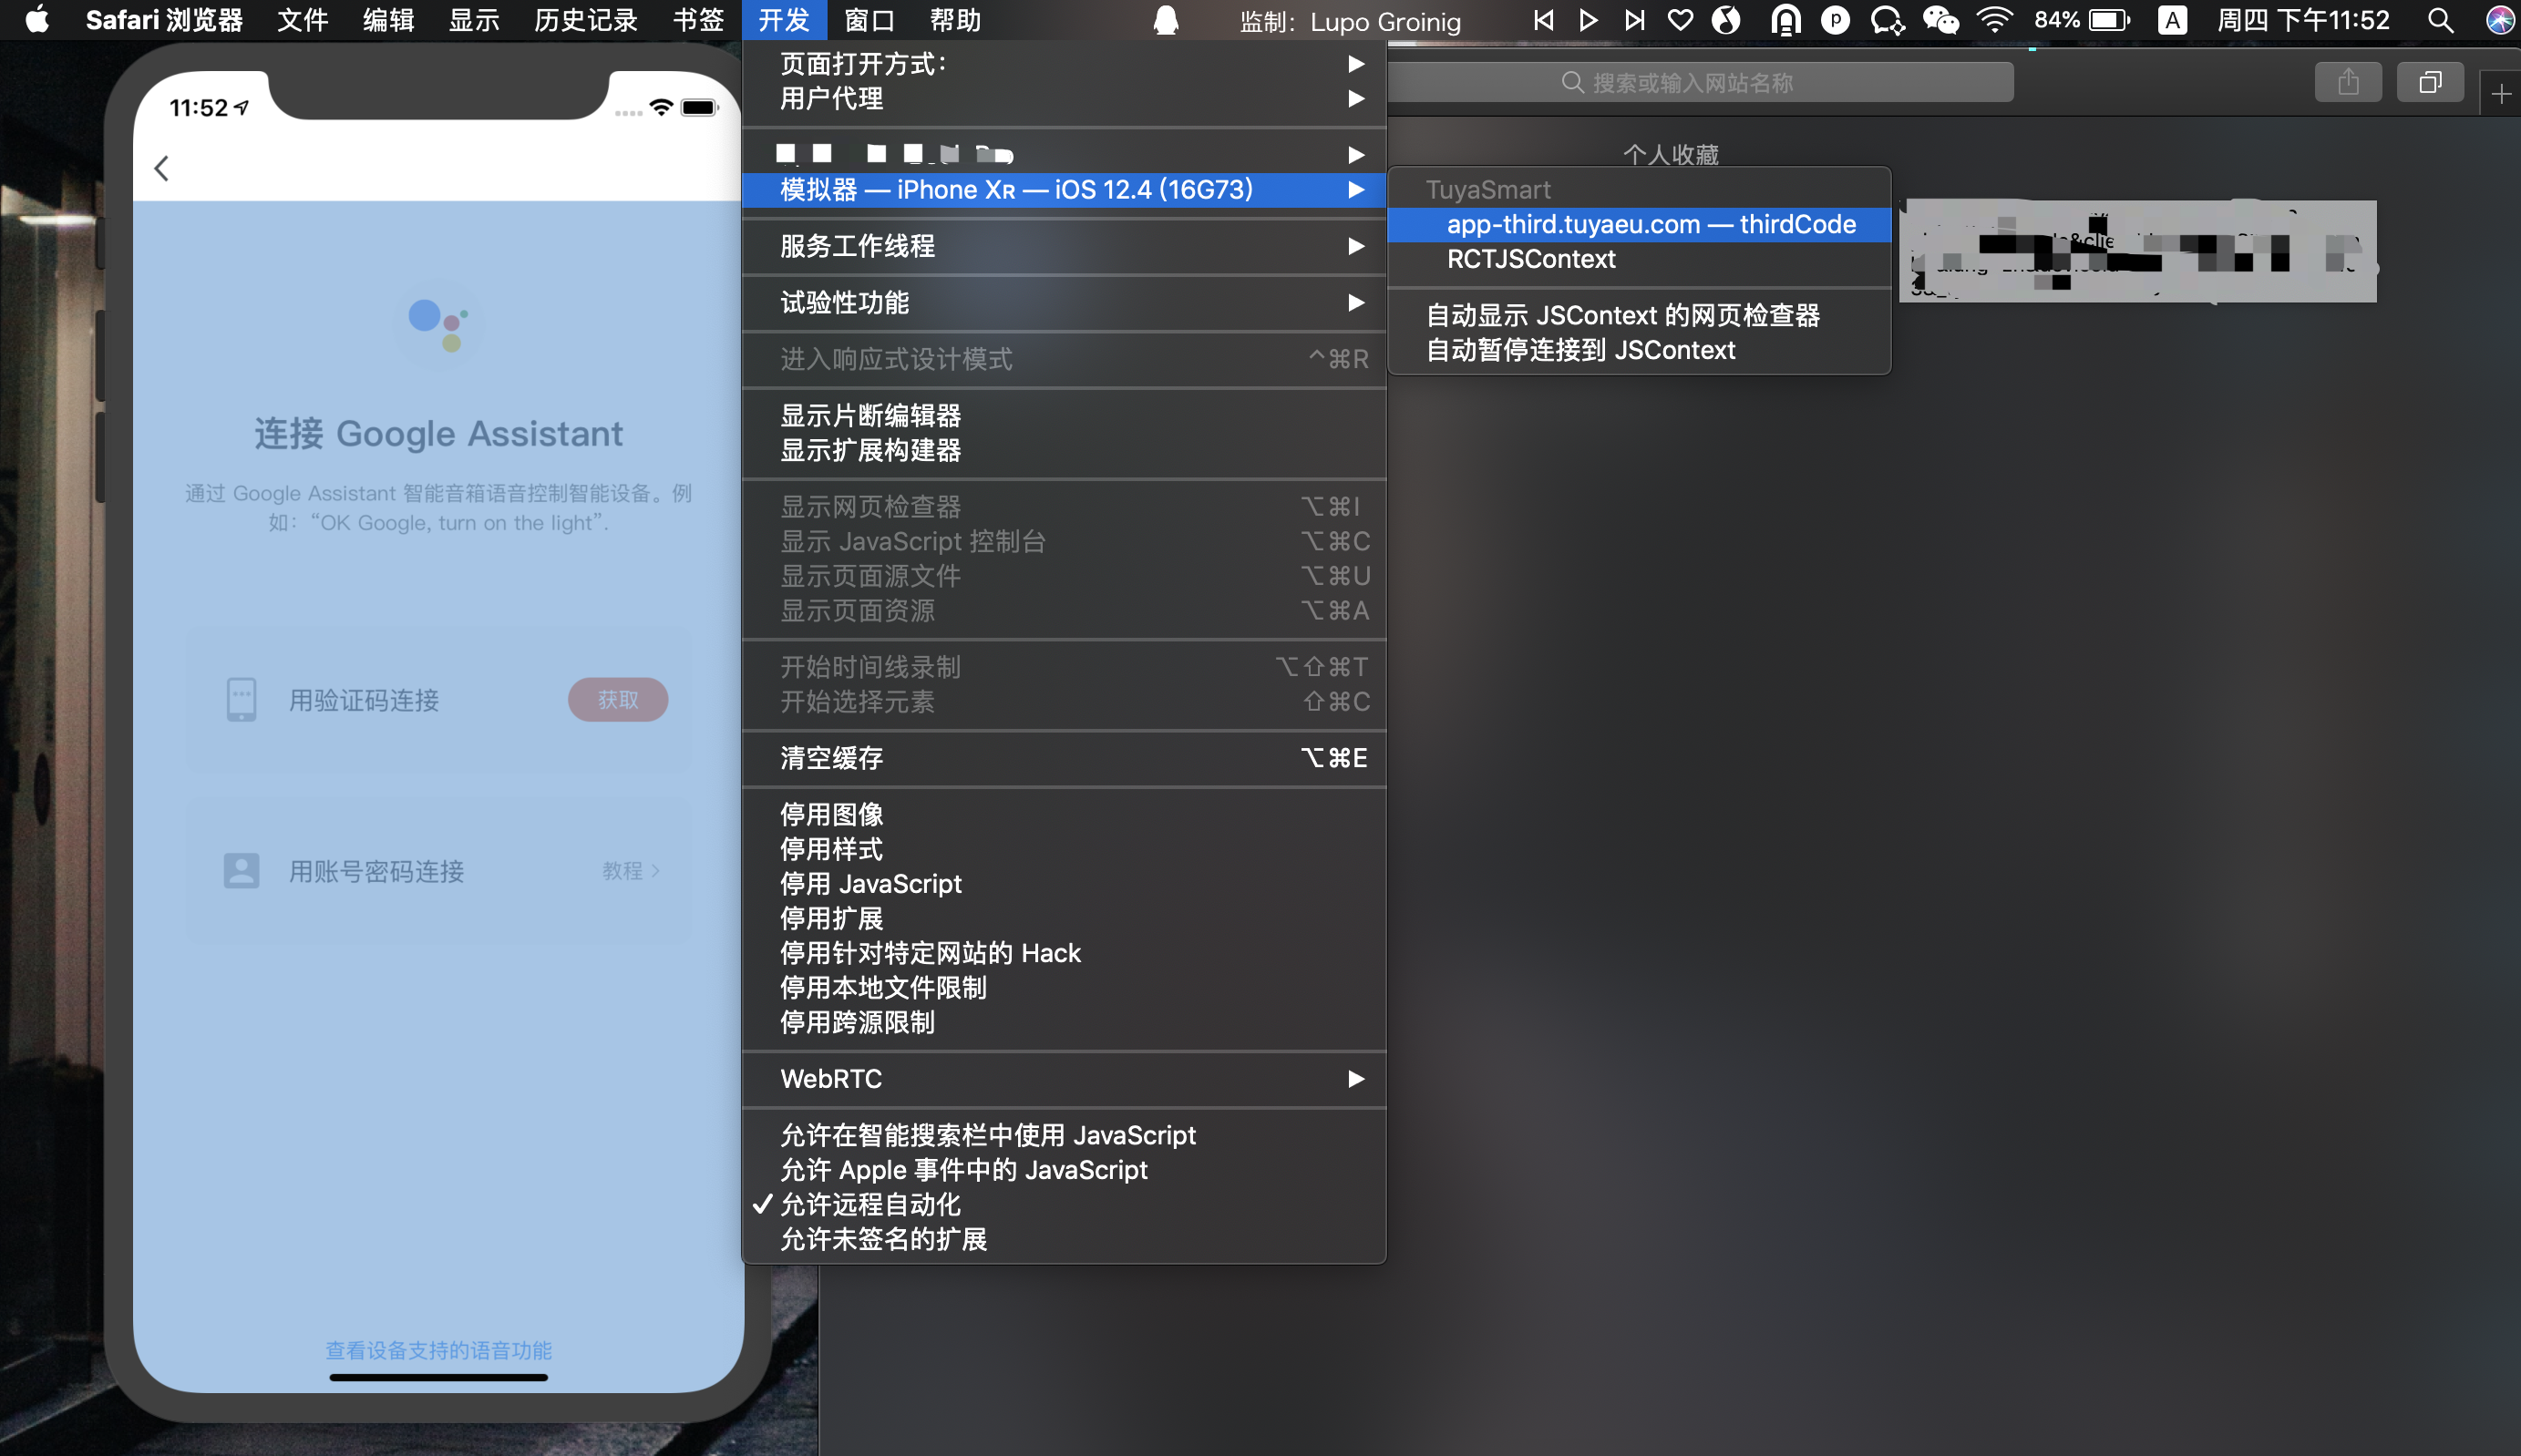
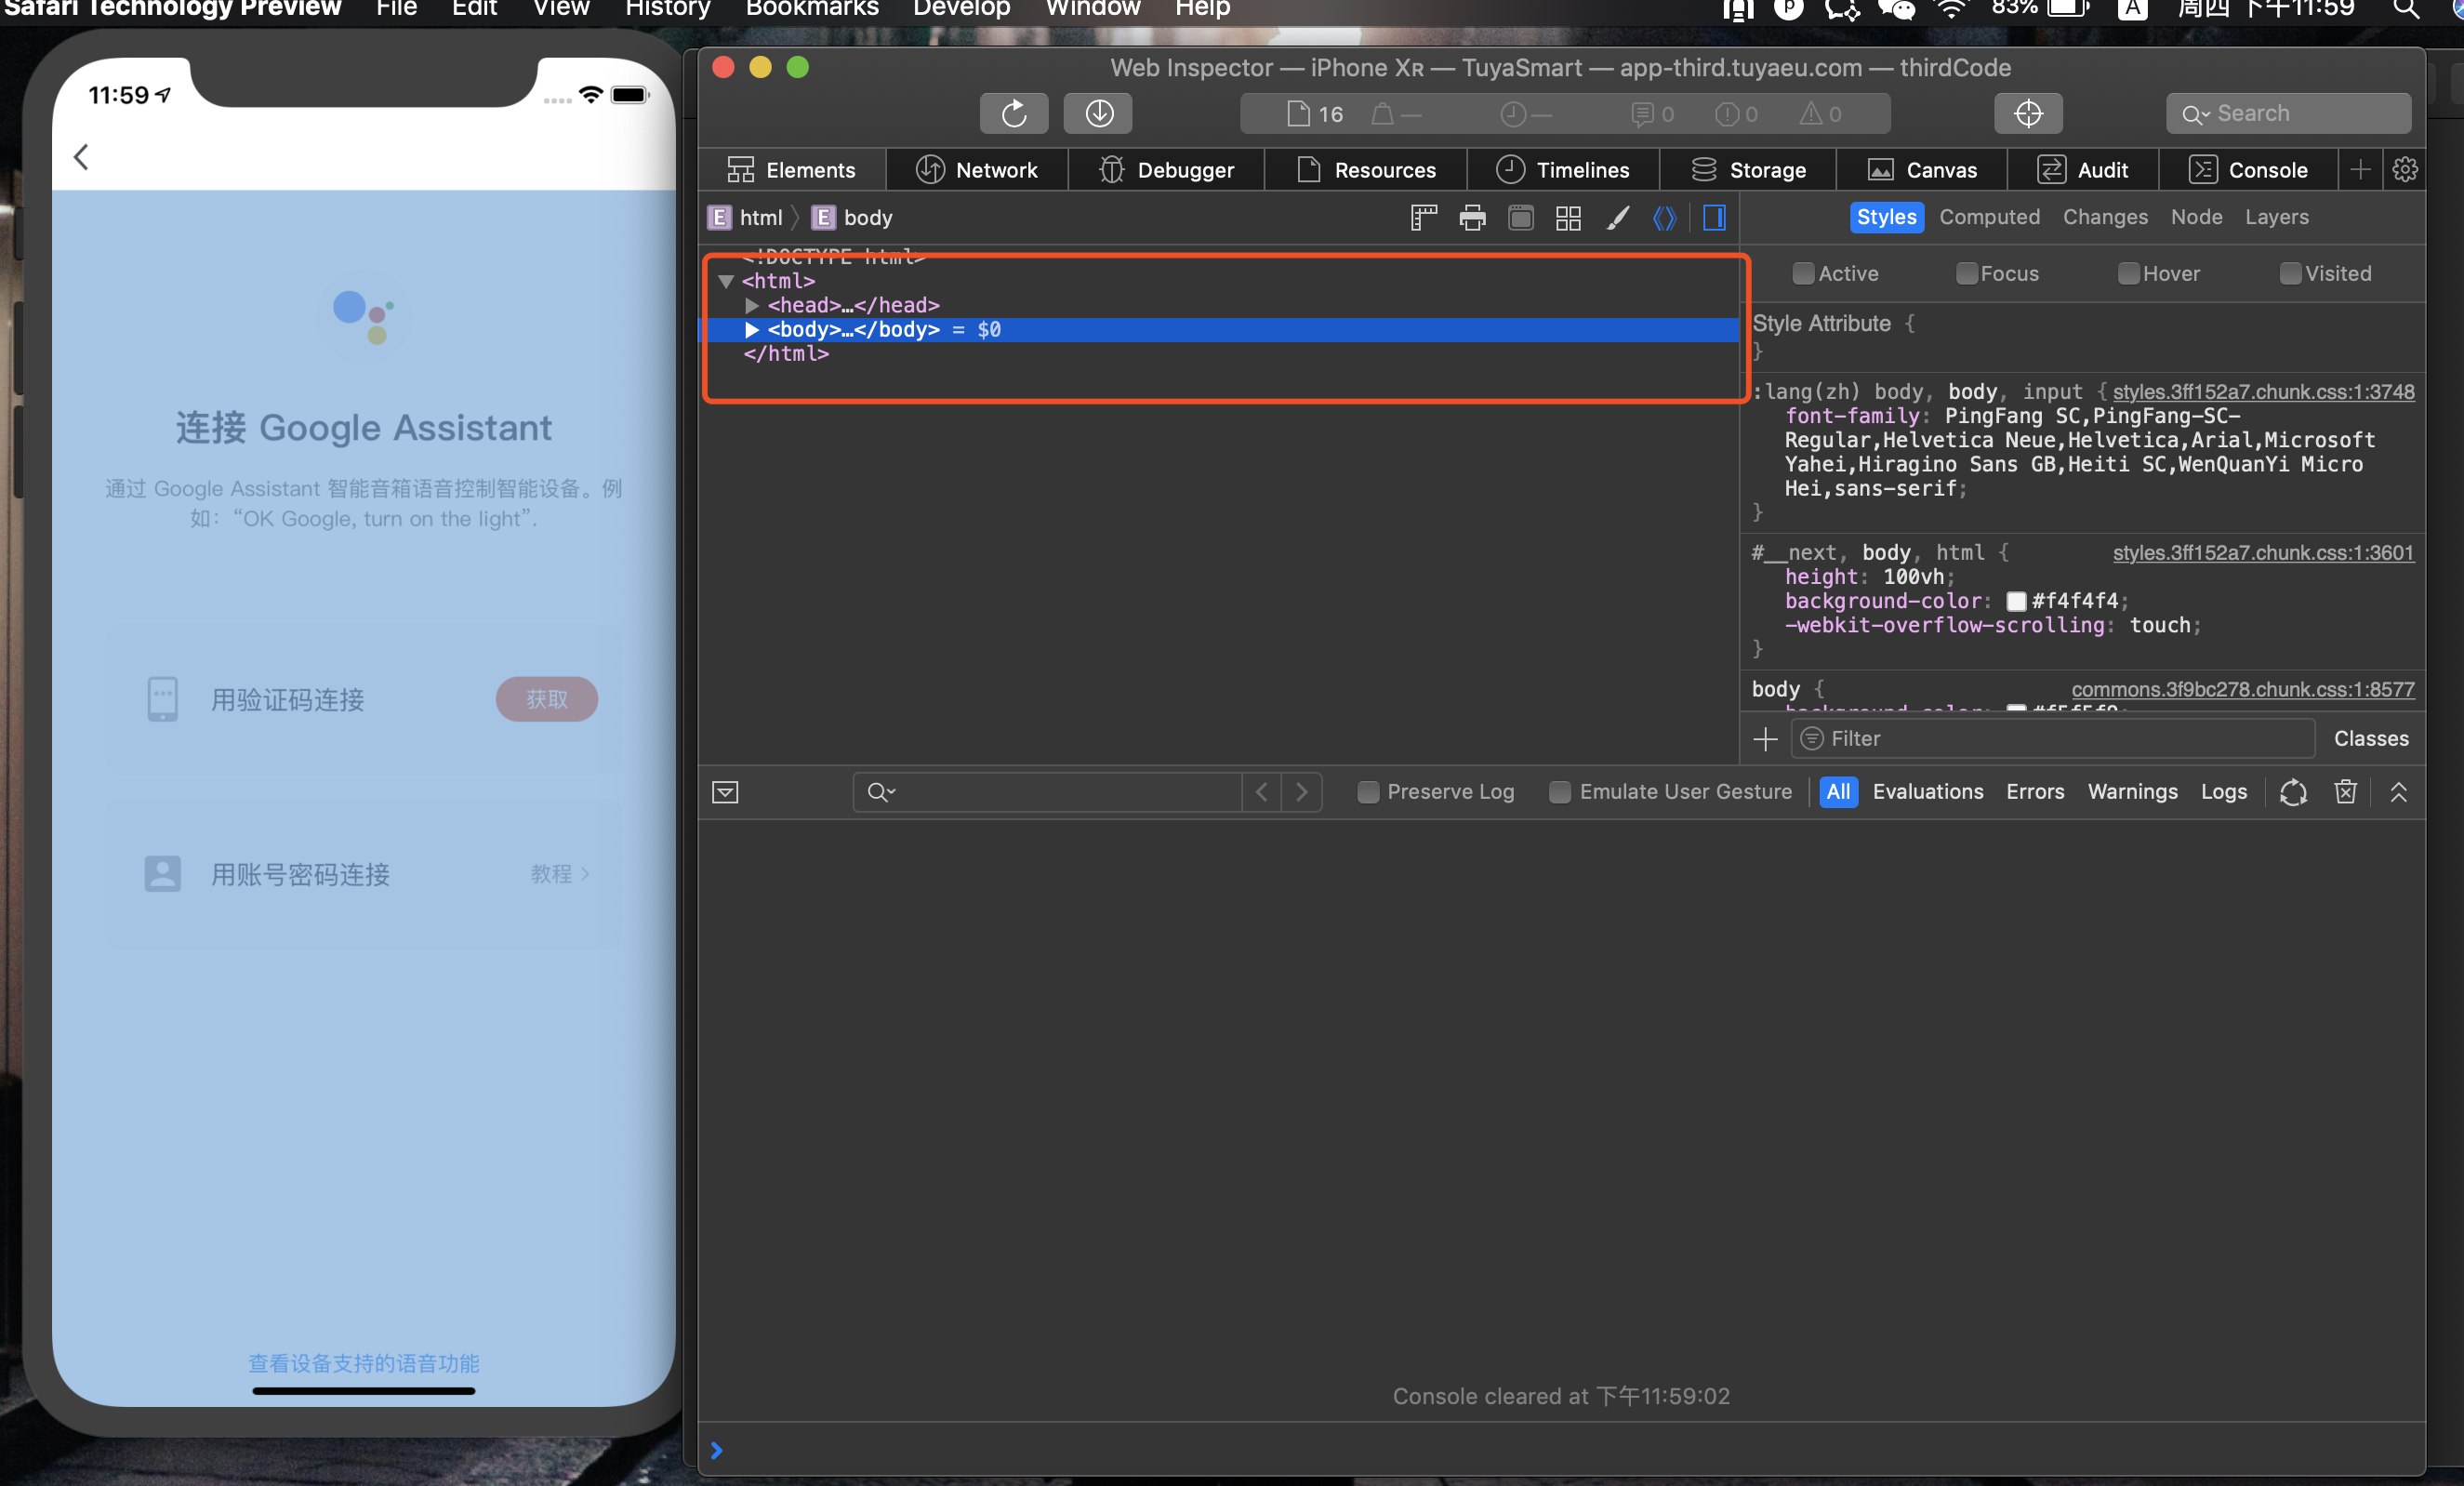
  • 在 safari 浏览器中选中 开发 下的 模拟器-xxxx 中页面对应的 URL,选中后模拟器中的对应页面会变色

    浏览器中选中页面

  • 在 safari 浏览器中检查元素

    浏览器中检查元素

小技巧

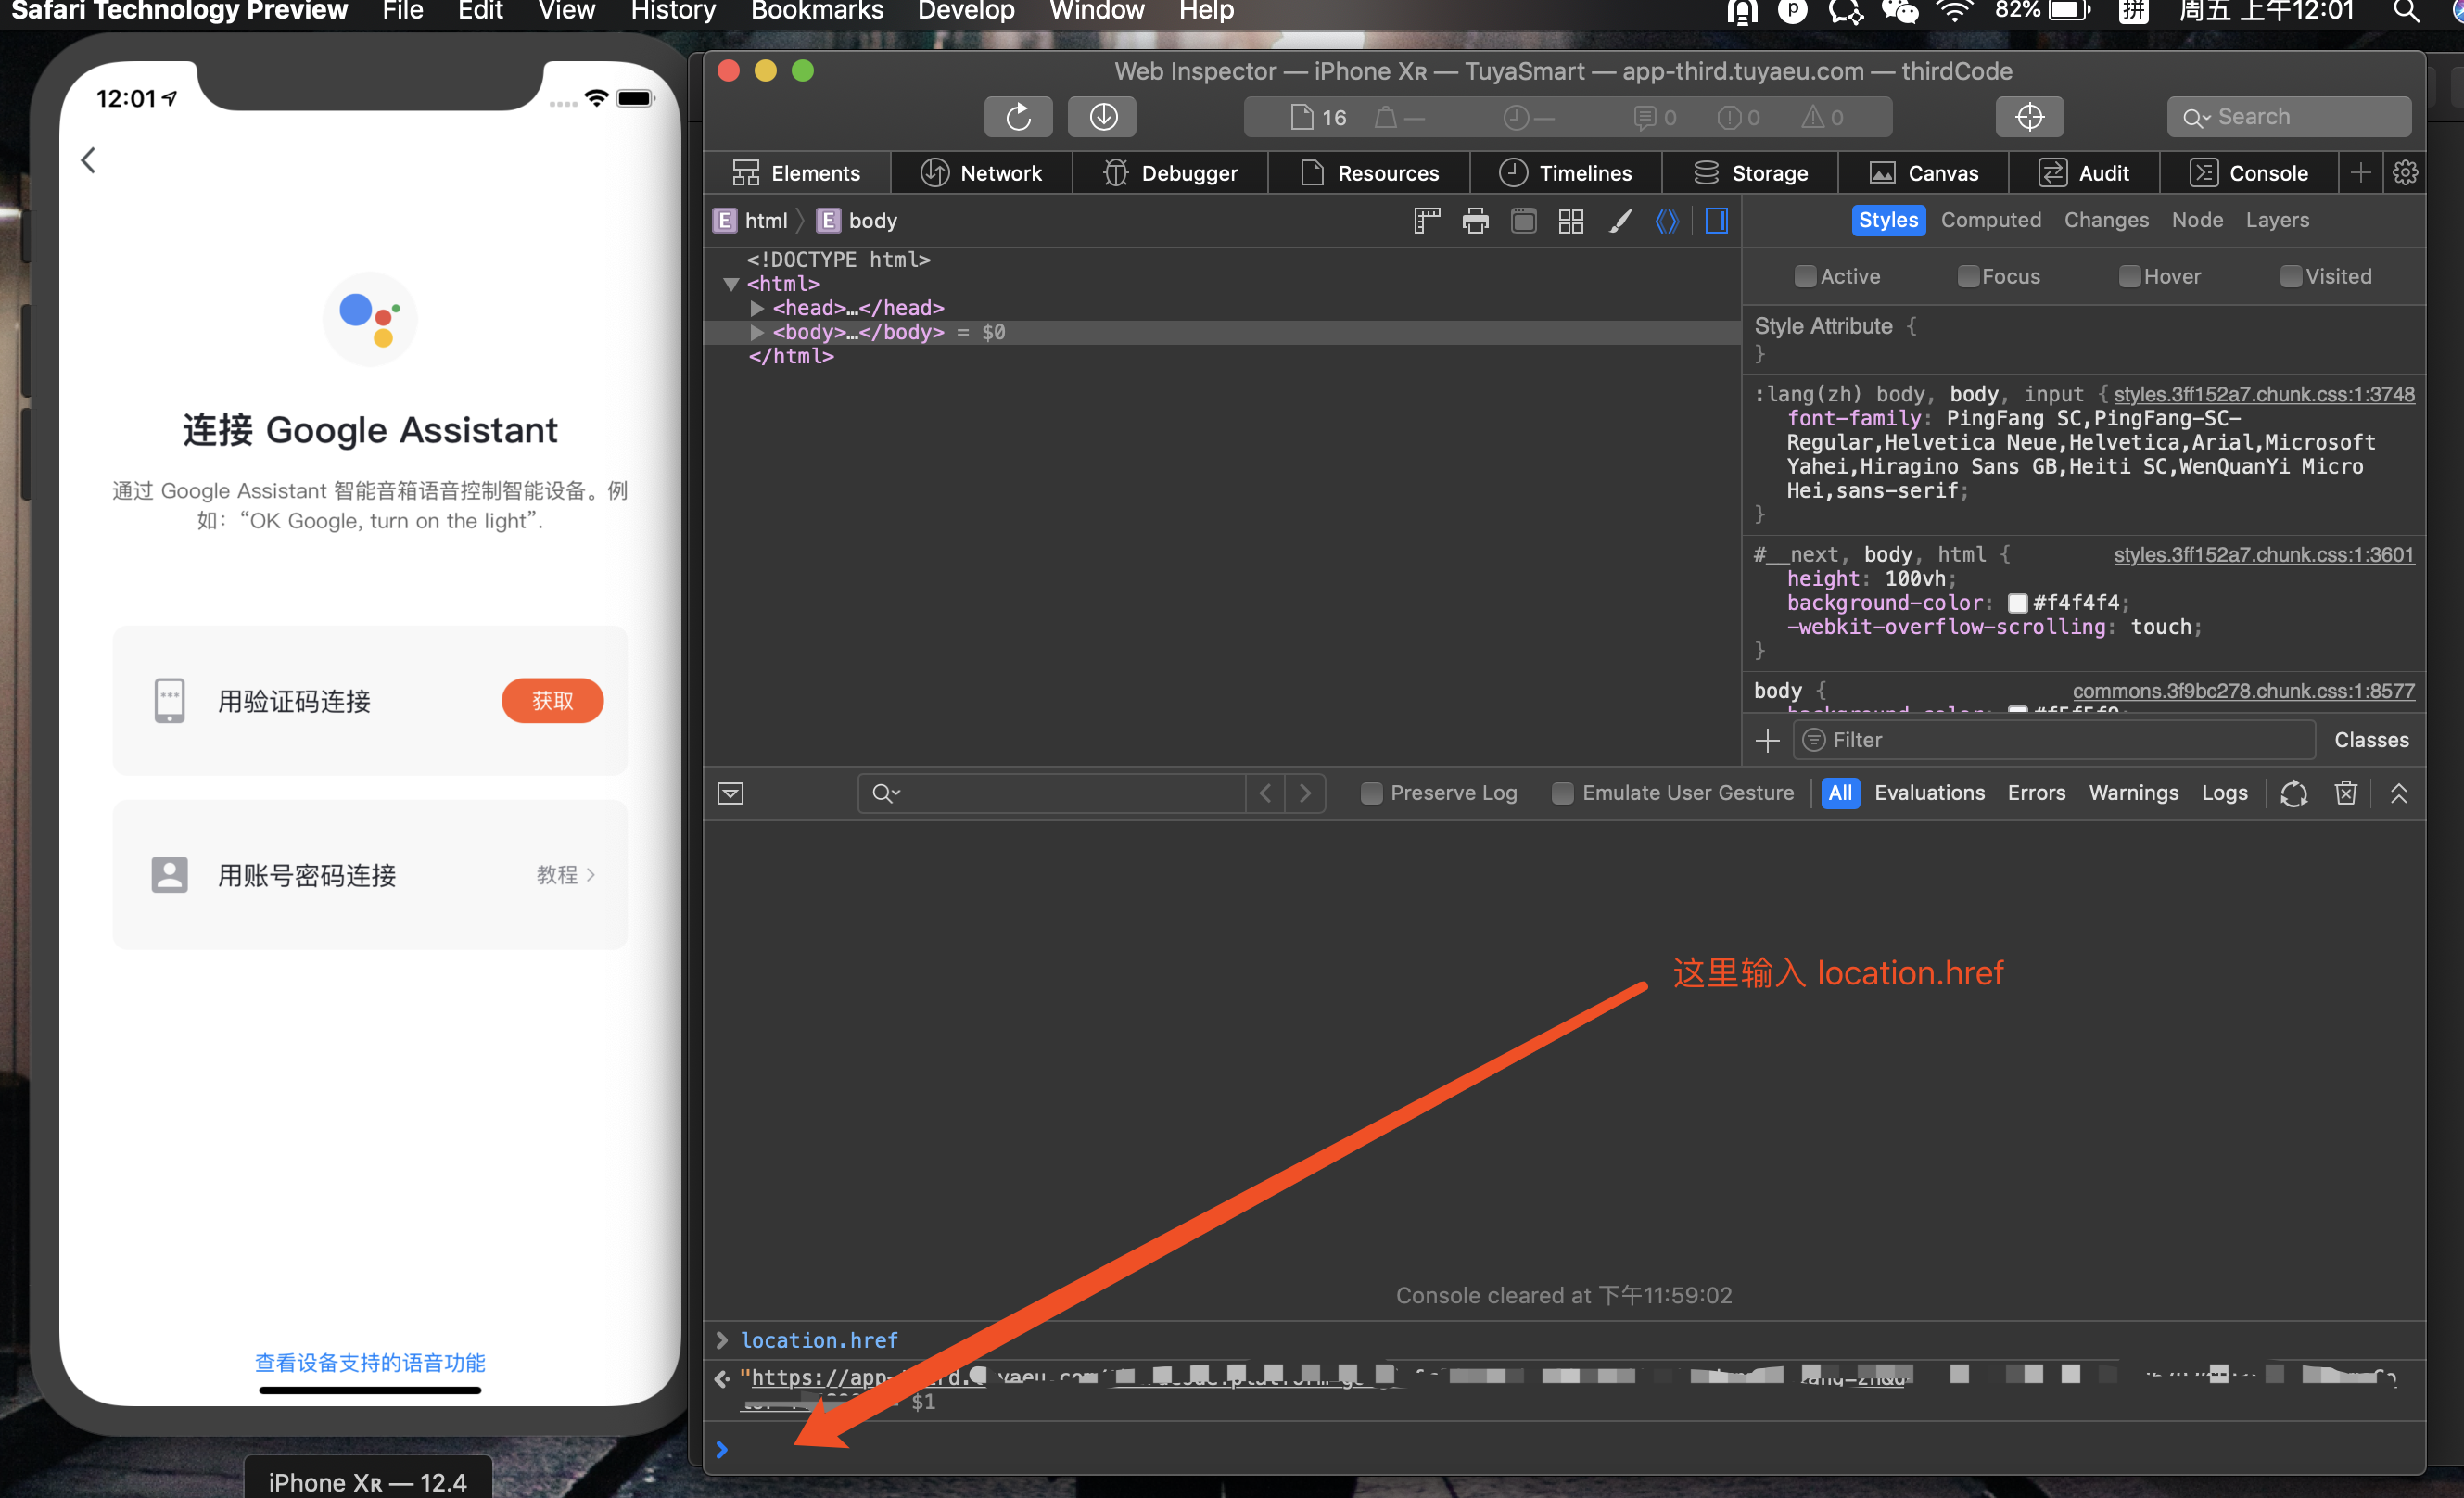
  • 在浏览器中查看当前页面的 URL 可以在控制台使用 location.href

    页面URL

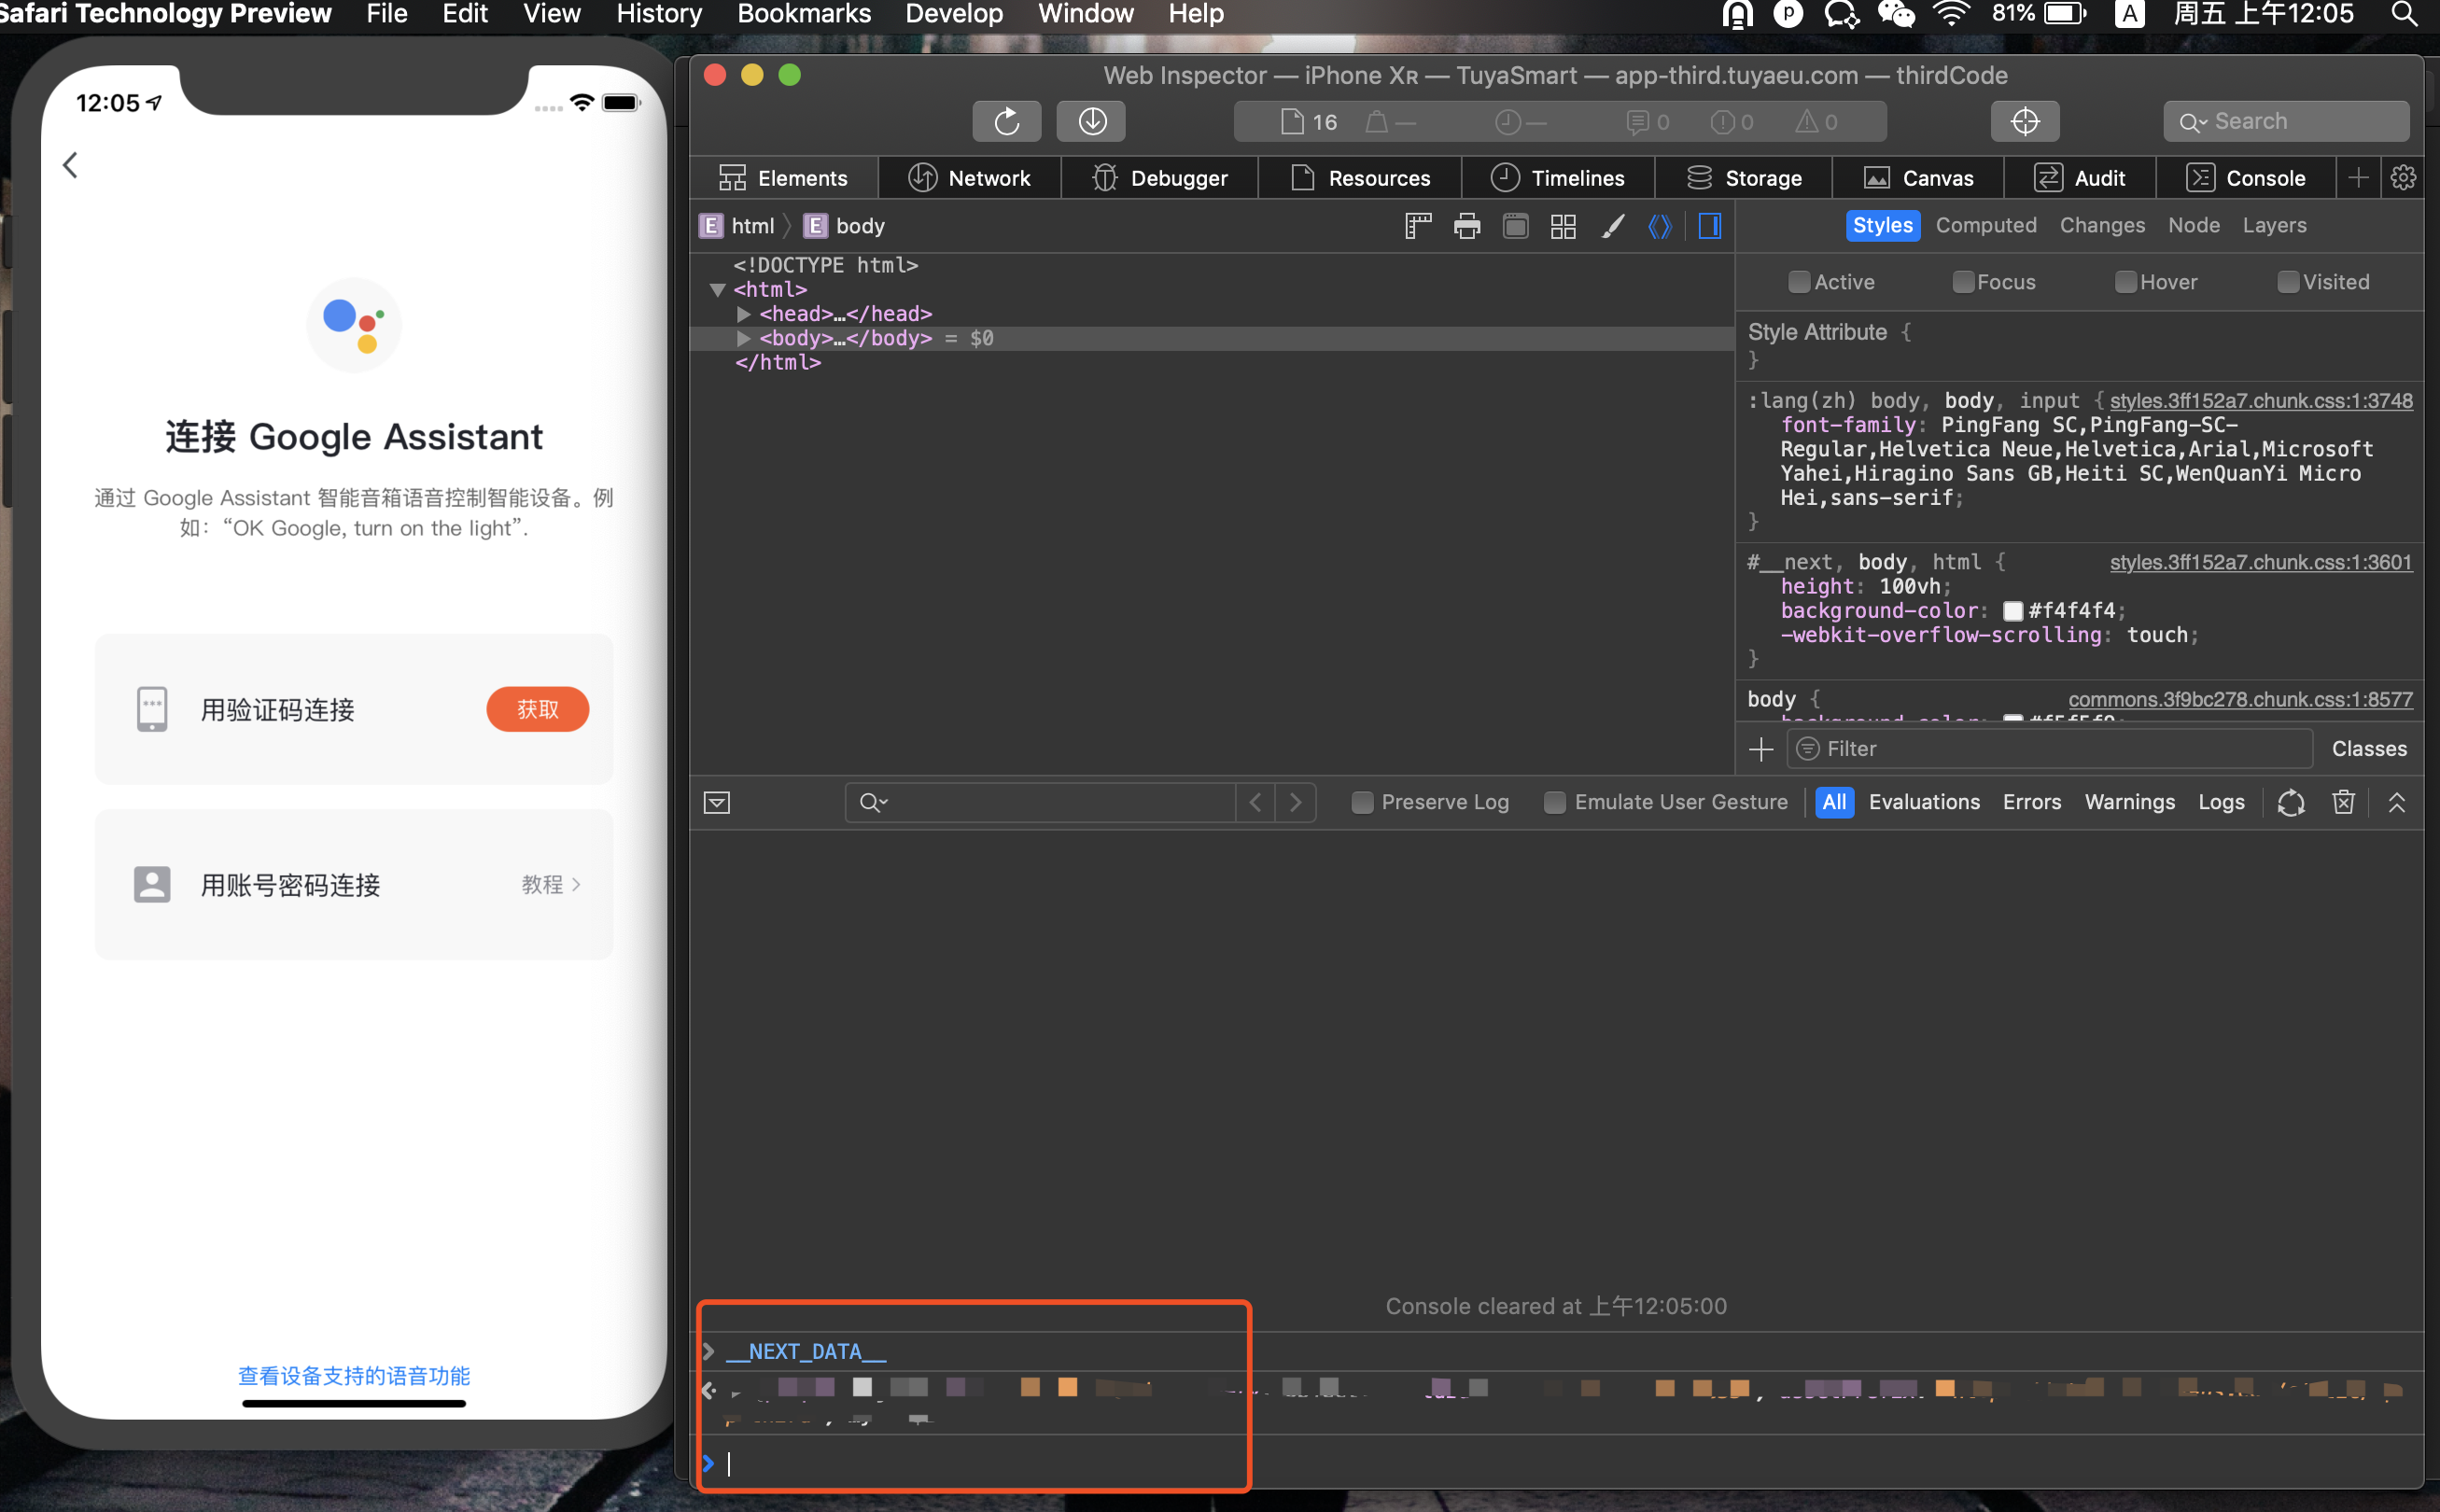
  • 在页面中查看 next 服务端请求的数据,在控制台输入

    页面 NEXT 数据

npm包

发布 npm 包

注册账号

npm 上注册账号

npm init 初始化项目

  • package.json
    1
    2
    3
    4
    5
    6
    7
    8
    9
    10
    11
    12
    {
    "name": "@test/test",
    "version": "0.0.1",
    "description": "test",
    "main": "index.js",
    "scripts": {
    "test": "echo \"Error: no test specified\" && exit 1"
    },
    "keywords": ["test"],
    "author": "",
    "license": "ISC"
    }
  • index.js
    1
    console.log("hello world!");

发布项目

  • npm login 登录
  • npm run publish 发布到 npm

注意

  • 如果发布的包是以 @ 开头的公有包,请使用 npm run publish --access public
  • 项目根目录的.npmignore可以指定忽略哪些文件发布到 npm

小技巧

  • 快速修改版本号

    1
    2
    3
    4
    5
    6
    7
    8
    9
    // version = v0.0.1
    npm version patch
    // v0.0.2
    npm version prepatch
    // v0.0.2-0
    npm version minor
    // v0.1.0
    npm version major
    // v1.0.0

参考链接

React学习系列(三)

react 16中的hooks

function组件中可以使用state和生命周期等class组件的属性

基础HOOKS

useState

function组件中使用state

1
2
const [state, setState] = useState(initialState); // 定义state和更新state的函数,state每次都会返回最新的state值
setState(newState); // 更新state,用法同class组件中的setState

懒初始化state

1
2
3
4
const [state, setState] = useState(() => {
const initialState = someExpensiveComputation(props);
return initialState;
}); // 只会在init render中执行一次初始化

useEffect

function组件中使用didMountdidupdatewillUnmout生命周期

1
2
3
4
5
6
7
8
useEffect(() => {
// 在didMount和didupdate生命周期执行
const subscription = props.source.subscribe();
// 返回的方法将会在组件将要卸载时执行
return () => {
subscription.unsubscribe();
};
}, [props.source]); // 第二个参数表示当传入属性变化时才会执行useEffect的回调,避免钩子函数重复执行

useContext

1
const value = useContext(MyContext);

接受一个context对象(数据来自React.createContext),返回当前context对象的最新值。当前context对象指虚拟dom树中最近<MyContext.Provider>的值。当最近的<MyContext.Provider>的上级组件更新时,这个HOOK也会用当前context对象的最新值重绘组件。

附加的HOOKS

useReducer

1
2
3
4
5
6
7
8
9
10
11
12
13
14
15
16
17
18
19
20
21
22
23
const initialState = {count: 0};

function reducer(state, action) {
switch (action.type) {
case 'increment':
return {count: state.count + 1};
case 'decrement':
return {count: state.count - 1};
default:
throw new Error();
}
}

function Counter() {
const [state, dispatch] = useReducer(reducer, initialState); // 当initialState为一个函数时只会在第一次初始化时调用,多个组件使用时
return (
<>
Count: {state.count}
<button onClick={() => dispatch({type: 'increment'})}>+</button>
<button onClick={() => dispatch({type: 'decrement'})}>-</button>
</>
);
}

useCallback

只有当依赖[a, b]有更新时才会返回一个新的memoizedCallback,优化子组件的不必要渲染

1
2
3
4
5
6
const memoizedCallback = useCallback(
() => {
doSomething(a, b);
},
[a, b], // 当依赖不提供时每次都会生成一个新的函数
);

useMemo

只有当依赖[a, b]有更新时才会返回一个新的memoizedValue,优化子组件的不必要渲染

1
const memoizedValue = useMemo(() => computeExpensiveValue(a, b), [a, b]); // 当依赖不提供时每次都会生成一个新的值

useRef

获取引用对象

1
2
3
4
5
6
7
8
9
10
11
12
13
function TextInputWithFocusButton() {
const inputEl = useRef(null);
const onButtonClick = () => {
// `current` points to the mounted text input element
inputEl.current.focus();
};
return (
<>
<input ref={inputEl} type="text" />
<button onClick={onButtonClick}>Focus the input</button>
</>
);
}